6 How to Use LibreOffice

Chapter 6, How to Use LibreOffice, includes the following four sections:

6.1 Create Custom Colors & Gradients
6.2 Create a Diagram with Libre Draw
6.3 Create a Chart with Libre Calc
6.4 Create a Presentation with Libre Impress

The first section describes how to add as many custom colors as you want to the default color selector – and then how to use these colors to create custom gradient colors to act as background colors for text boxes and diagrams.

The second section explains how to create a custom diagram with Libre Draw.

The third section demonstrates how easy it is to create a chart using Libre Calc.

The fourth section reviews how to make a slide presentation with Libre Impress.

00

6.1 Create Custom Colors and Gradients

There are a couple of drawbacks to LibreOffice. The first is that it does not come with as detailed of a color selector as MS Office. The second is that it does not come with a Gradient Background selector. In this article, we will review how to add both of these color tools to LibreOffice.

How to Add Custom Colors to LibreOffice

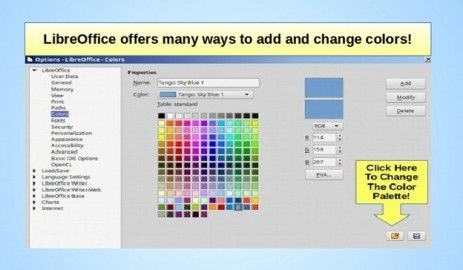
As we described briefly at the end of Section 5.3, if you open a Libre Draw document, then click on Format, Area, you will see the Standard Palette:
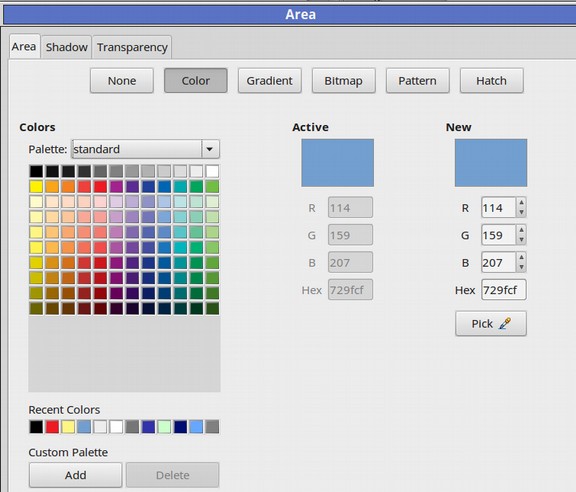
6.1.01r

Sadly, you cannot add colors to the Standard Palette. If you clicked on the Pick button, chose a New color, then clicked on the Add button and give the new color a name, the color would be added to your Custom Palette – not the Standard palette - as we described in Section 4.3. So when you add new custom solid colors, always use your Custom Palette. In our Custom Palette, which you can download for free at several of our websites, we have created several very light background colors. These will be the base colors for our gradient background colors. Each color is created by clicking “Pick” Then using the Hexadecimal option to create the color.
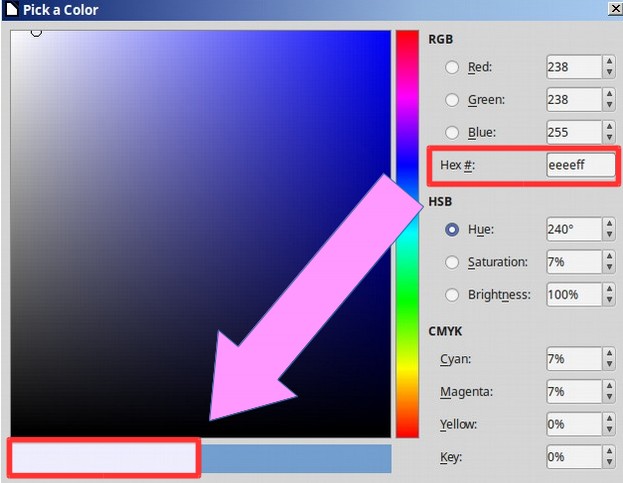
6.1.02

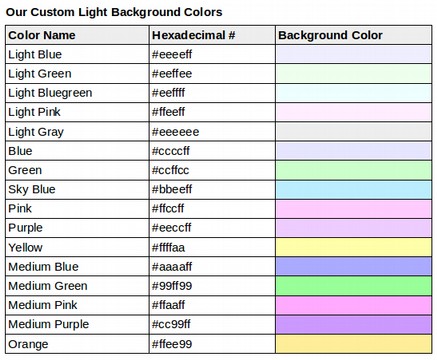
Then click OK. Then click Add and give the color a name. Repeat to add the other colors. Below is a table of hexadecimal values for our background colors.

Our Custom Light Background Colors

Color Name

Hexadecimal #

Background Color

Light Blue

#eeeeff

Light Green

#eeffee

Light Bluegreen

#eeffff

Light Pink

#ffeeff

Light Gray

#eeeeee

Blue

#ccccff

Green

#ccffcc

Sky Blue

#bbeeff

Pink

#ffccff

Purple

#eeccff

Yellow

#ffffaa

Medium Blue

#aaaaff

Medium Green

#99ff99

Medium Pink

#ffaaff

Medium Purple

#cc99ff

Orange

#ffee99

Here is an image of the above table:

6.1.03

Here is an image of our Custom Palette after adding all the above colors:
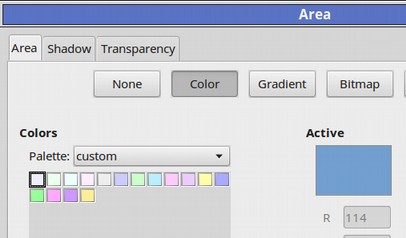
6.1.04

Here is our Custom Palette after exporting the file and importing it back as a Writer Extension:
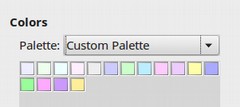
6.1.05

Once we have our very light background colors added as a Custom palette, we are ready to create new light gradient background colors.

Create New Linear Gradient Background Colors

Open a new Libre Draw or Libre Impress document. Then click on Format, Area. Then click on the Gradients tab. Here is the default gradient screen:
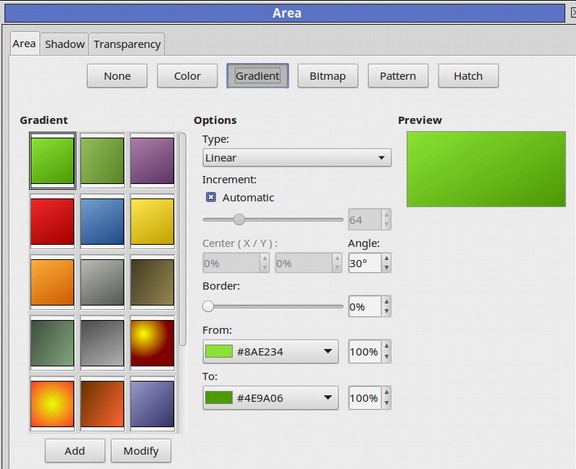
6.1.06

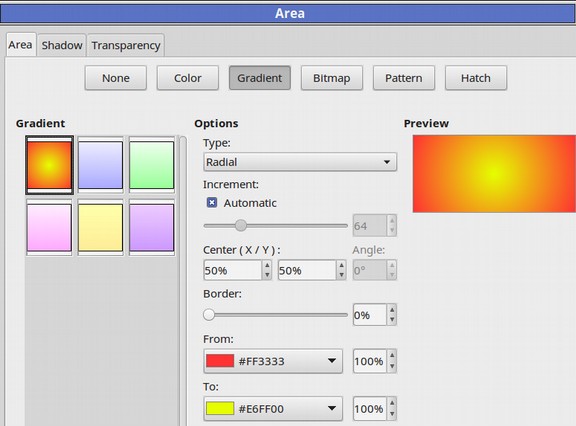
This is a very ugly set of gradients – none of which are suitable for background images. We will therefore make our own custom gradient background images. Note that the first gradient in the upper left corner is Light Green to Dark Green at a 30 degree angle. Change the angle to 0%. Then change the top color to Light Blue. Change the bottom color to Medium Blue.
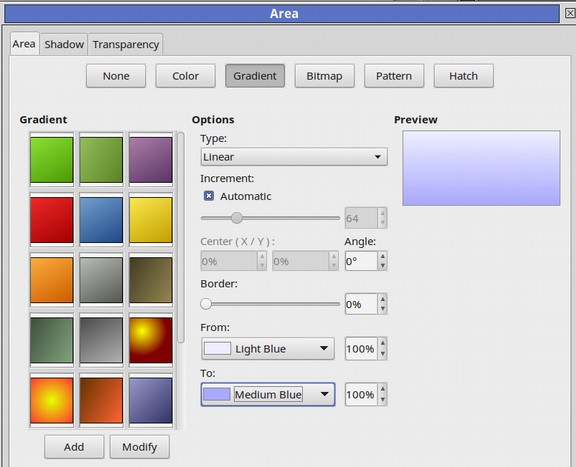
6.1.07r

Then click Add and name the gradient Light Blue. Click OK. Change the From color to Light Green and the To color to a slightly darker green (but not dark green).

Then click Add and name it Light Green. Add Light Pink, Light Yellow, Light Purple and Light Sky Gradients using these same steps. Then select and delete all the other gradient colors except Radial Red Yellow.
6.1.08

Create New Radial Gradient Background Colors

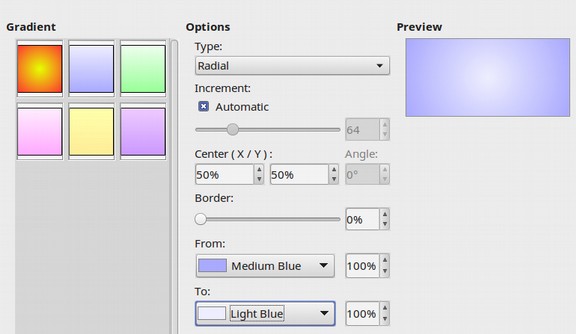
We will next use the Radial color to create some radial gradient background colors. Change the from color from Red to Medium and the To color to Light Blue.
6.1.09r

Then click Add and Name it Radial Blue. Repeat to create Radial Green, Radial Pink, Radial Sky, Radial Purple, Radial Orange and Radial Yellow. When we are done, click OK. Unfortunately, our Custom Gradient color palette cannot be exported and installed via the Extension Manager like our Custom Solid Color palette can. Instead, we need to find the exact location of the existing LibreOffice gradient file and then copy it so in the future we can share this palette with others and/or use it to replace the ugly Gradient palette that comes with LibreOffice.

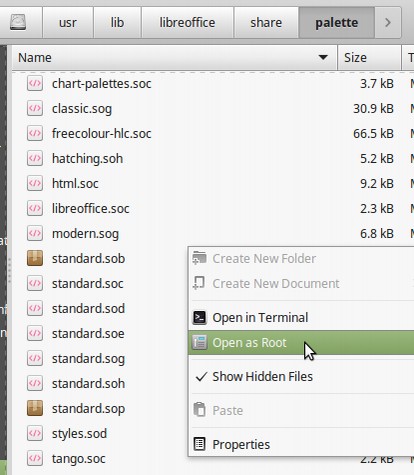
The fine folks at LibreOffice have moved this file around over the years just to keep us on our toes. But for now, this is the current location of this file in our File Manager. Click on File System, then open the USR folder. Then the LibreOffice folder. Then the Share folder. Then the Palette folder and look for this file:

usr/lib/libreoffice/share/palette/standard.sog

Then right click and select Open as Root. Enter your password.
6.1.10

Copy this standard.sog file. Then put this file in your Libre Office Extensions folder. Should you replace either Mint or LibreOffice in the future, you can add this file back to the new installation by renaming the default gradient file something like xstandard.sog. Then copy and paste the custom standard.sog file into this folder. Then Save and Close. Then open a LibreDraw document and go to Format, Area, Gradient. We now have our solid background colors, linear gradient background colors and radial gradient background colors installed in LibreOffice which we will use to create documents for our books and websites.

What’s Next?

In the next article, we will review how to create a diagram with Libre Draw.  

6.2 Create a Diagram with Libre Draw

LibreDraw is a function that is completely missing in MS Office. While we can make simpe diagrams just using the drawing functions of Libre Writer, using Libre Draw gives us much more flexibility. We can create a Libre Draw document for every one of our complex diagrams and then copy the image to our Libre Writer documents. Then if we need to modify the diagram, we can go back into the Libre Draw original document, make the needed changes and copy another image into our Libre Writer document. The Libre Draw diagrams can also be created using a different page background from our Libre Writer document helping to set off the diagram from the rest of the text.

To open a new Libre Draw document, click File, New, Drawing. The document will look something like a Libre Writer document.

01

Click File Save As and give the diagram a name. We will first choose a background color for the entire page by going to Format Page, click on the Background tab and click on the dropdown to choose Gradient, then pick a gradient color then click OK.

02

We will next give the diagram a title in a rounded box. Because the standard tool bar and text formatting tool bar appear on the same row, in order to make room for a few text formatting tools, I unchecked most of the standard tool bar icons.

03

Select the title box to give it a different background color using the Fill Color icon in the left menu.

04

The line color just above the fill color and give the border a color. But to set the width of the border requires a right click after selecting the title box.

05


Add a Flow Chart with the Default Libre Draw Function
There are a couple of ways we can add flow charts. The first way is to use the default Libre Draw Flow Chart Icon. This icon is in the left side menu near the bottom.

6.3 Use Libre Calc to Create a Chart

Having spent many years making hundreds of charts and teaching others how to make charts, and having spent the past five years dealing with the ridiculous process used by the Office 2010 and Office 2013 Excel Chart Wizard, I am extremely impressed by the LibreOffice Chart Wizard. It is a much more logical process than the new Office chart wizard. To open Libre Office Calc from the Writer Menu, click on File, New, Spreadsheet.
01

This will bring up the Calc Window. We will begin by deleting a few of the icons on the standard tool bar in order to see the chart creation icon.
02

We will convert the following table to a chart:

Windows Version

Recommended Space

on Hard Drive (MB)

Windows 3.1

15

Windows 95

50

Windows 98

500

Windows ME

2,000

Windows XP

2,000

Windows VS

15,000

Windows 7

20,000

Windows 8

20,000

Windows 10 + MS Office

23,000


Copy and paste this simple table into the Calc table and save as “Windows OS File Size Increase over Time”:


03
Select the data cells, then click on the Three bar “Chart” Icon in the top menu. This creates a chart:

04

It also brings up a chart editing screen:

05

Click on Bar to turn the chart into a bar chart:

6.4 Use Libre Impress to Make a Slide Presentation

Our next mission is to create a Slide Presentation with LibreOffice Impress similar to the following slide.

01

The most impressive feature of Libre Office Impress is the ability to define a variety of custom background colors and effects. To open LibreOffice Impress from the Writer Menu, click on the Blue box below the Edit Menu item.

02

Then click on Presentation:

03

Change the Presentation to a 16x9 Ratio

Click Format Page. Then click on the Page Tab.

04

By default, the slide presentation is set for a 4 to 3 screen ratio. This ratio is generally for very old computers. If we want to create a slide presentation to match our Acer C910 screen, or to use in a full screen video presentation, we should change this to a 16 to 9 ratio. This is often called a Wide Screen Format. This 16 to 9 ratio is now the best ratio for a presentation that will be posted to Youtube. 16 x 9 is also a better ratio for posting a slideshow on the Home page of a website because screen height on the home page initial display is pretty limited. After selecting 16 x 9 ratio, the width will remain 11 inches but the height will be reduced to 6.2 inches. Click OK.

Access Default Background Designs
Click on Format, Slide Design and you will see that there is only one design to choose from.