logo 3000x520

Learn Linux and LibreOffice
  • Home
  • 1 Why Switch to Linux
    • 1.1 Why Use Linux Instead of Windows
    • 1.2 Why Linux is More Secure than Windows
    • 1.3 The Fatal Flaw of the Windows Monopoly
    • 1.4 UEFI... The Microsoft Kill Switch
    • 1.5 Case Studies on Need for Better Tech Awareness
  • 2 Linux to the Rescue
    • 2.1 History of Linux Operating Systems
    • 2.2 Five Ways to Try Linux
    • 2.2 Take Linux Mint for a Test Drive
    • 2.3 Create a USB Stick with Persistent Storage
    • 2.4 Introducing DistroTweaks
  • 3 Linux Computer Options
    • 3.1 Problems with Current Computer Options
    • 3.2 Linux Coreboot Laptop Options
  • 4 Pinebook Pro Tips
    • 4.1 Initial Startup Tips
    • 4.2 Install and Simplify LibreOffice
    • 4.3 Install Additional Programs
    • 4.4 Connect a Printer
  • 5 Benefits of LibreOffice Writer
    • 5.1 Why Libre Writer is better than MS Word
    • 5.2 Simplify Libre Writer
    • 5.3 Add Extensions to Libre Writer
    • 5.4 Create your own Custom Template
  • 6 How to Use LibreOffice
    • 6.1 Create Custom Colors and Gradients
    • 6.2 Create a Diagram with Libre Draw
    • 6.3 Create a Chart with Libre Calc
    • 6.4 Make a Presentation with Libre Impress
  • 7 Manage Linux
    • 7.1 Backup Your Programs and Settings
    • 7.2 Back Up Documents with USB and Mega
    • 7.3 How to Find and Remove Duplicate Files
    • 7.4 How to Use Mint Workspaces and Rollups
  • 8 Linux Security Tips
    • 8.1 Linux Security Awareness
    • 8.2 Linux Security Tools
    • 8.3 Get a More Secure Email Address for Free
    • 8.4 Use TOR... a More Secure Web Browser
  • 9 Final Steps to Freedom
    • 9.1 Free Alternatives to Windows Programs
    • 9.2 Set Up a Free Email Organizer
    • 9.3 How to Run Windows Programs in Linux
    • 9.4 How Will Knowledge be Shared in the Future
  • 10 Secure Video Conferencing
    • 10.1 Why Jitsi for Secure Video Conferencing
    • 10.2 Use Jitsi Breakout Rooms
    • 10.3 Record a Jitsi Video Conference
    • 10.4 How to fix Jitsi Meet video and audio permission settings
    • 10.5 How to call into a Jitsi Meet video conference
  • NEWS
    • The Fight for a Secure Linux BIOS
    • Hidden Dangers of Ryuk Ransomware
    • Did Lilu Ransomware Really Infect Linux Servers
    • False Accusations Against Linux Security Continue
    • Why and How to Do Your Taxes with Open Tax Solver
  1. You are here:  
  2. Home
  3. 10 Secure Video Conferencing

10 Secure Video Conferencing

Closed source video conferencing tools such as Zoom are not secure. In the following three articles, we explain why and how to replace Zoom with a free open source video conferencing tool called Jitsi.

10.1 Why Jitsi for Secure VIdeo Conferencing

10.2 Use Jitsi Breakout Rooms

10.3 Record your Jitsi Video Conference

10.1 Why Jitsi for Secure Video Conferencing

Jitsi is a free open source video conferencing tool that works on any computer. It does not require setting up an account or paying a monthly fee. By contrast, Zoom charges an annual fee that runs from $150 for a single user to $250 a year for a business. You can add any number of people to your Jitsi video conference and you can run your video conference for several hours for free rather than the 40 minute limit imposed by the Zoom free account.

Why Jitsi is much more secure than Zoom

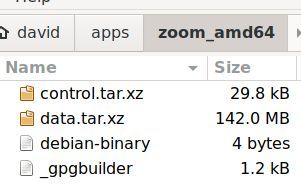
But the biggest advantage of Jitsi is that it is dramatically more secure than Zoom. This is because moderators and participants do not need to download anything to use Jitsi. Just open any web browser and go to your Jitsi video conference room. By contrast, to use Zoom, you need to download a Zoom app which has a file size greater than 142 MB. If you extract this file, you see these files:
01

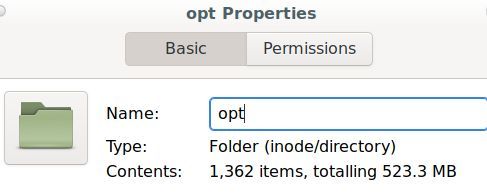
Extract the largest file and click on Properties for the two folders to see that the opt folder has 1,362 files and a total file size of 523 MB.
02

This means that Zoom is actually larger that the Linux operating system and about 5 times larger than a draconian Deep State program called UEFI – which itself is capable of remotely bricking any Windows or Apple computer.

To give you an idea of how large 523 MB is, the classic book called Moby Dick has 213,533 words divided over about 400 pages. The book Moby Dick has a file size of about 1 megabyte. Thus the Zoom app is the equivalent of more than 500 copies of Moby Dick or more than 200,000 pages of code! But the worst part is that nearly all of this code is hidden. It is not open source. It is not subject to an independent inspection or audit. This makes the Zoom app one of the worst pieces of malware ever written. Requiring your participants to each download this app and placing it on their computer not only places your computer at risk – but also the computers of all of your students. Thus, even if Zoom was free, you should not use it or force others to use it.

By contrast, the code for Jitsi is entirely open source and therefore subject to public audits. These audits can and do confirm that there are no hidden back doors in any Jitsi programs. Now that we know some of the benefits of Jitsi, let’s see how easy it is to use.
Read more: 10.1 Why Jitsi for Secure Video Conferencing

10.2 Use Jitsi Breakout Rooms

Breakout Rooms let you temporarily split your Jitsi meeting into smaller groups, with each group meeting in its own unique video conference room. By using Breakout Rooms, a Moderator can separate meeting participants into several small groups for more focused conversations and then bring them back into the main room at any time. Each Breakout Room is distinct and completely separate from other rooms and the main room in terms of audio and video, so there is no audio or video leak or interference between rooms.

In Jitsi, only Moderators can create Breakout Rooms. The moderator is the first person in the video conference room. The moderator can create break out rooms at any time before or during a meeting. The Moderator can either assign participants to specific rooms or have participants join rooms on their own. Currently, users can move between rooms without restriction and can go back to the main meeting room at any time.

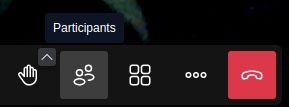
To create your first Breakout room, start a Jitsi video conference and click on Participants icon in the bottom menu.

01

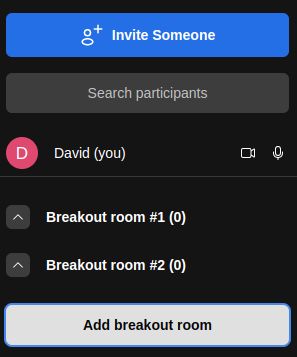
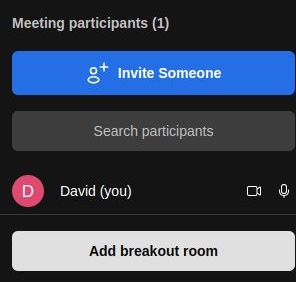
This opens the hidden Participants panel on the right side of the screen:

02

Click Add breakout room to add a room called Breakout Room 1. Click again to add Breakout Room 2:

03

To put participants in a breakout room, they first have to join the main meeting. But you can practice moving to and from a breakout room even if you are the only person in the video conference.

Read more: 10.2 Use Jitsi Breakout Rooms

10.3 Record a Jitsi Video Conference

It is possible to use Jitsi’s internal video recorder to record a video of your Jitsi meeting and then download the video to your home computer and or Google Drive account to share with others. Unfortunately, the Jitsi Start Recording button does not appear in Firefox. You will therefore need to use some version of the Google Chrome browser, for example Chromium or Brave. With these browsers, the Start Recording button will appear just above the Live Recording button and just below Security options.

You should definitely practice making short recordings before making the real thing as there are several problems that may crop up. The first problem is that there is a time limit on how long the Jitsi Built in recorder will record. It is about 90 minutes. So if your class runs longer than that, you will need to stop the video and download it and start a new video.

The second problem is screen sharing. The recording appears to be limited to recording just the main Jitsi screen. If you try to share a different screen or switch between shared screens, the recording will turn itself off without warning.

The third problem is that the Jitsi video recorder does not offer a way to precisely control the width to height ratio of the recording. Ideally, we want the video to be a 16 wide by 9 high ratio to display on YouTube, Rumble and or other video sharing platforms.

The fourth problem is that to actually download the video, you first need to click on Stop Recording. A popup will appear where you can choose the folder in your file manager where you want to save the video. Currently, the video will only save as a WebM video. While this format can be converted to an MP4 format if needed, it is still a hassle and may result in a lower quality video or increased file size.

I am therefore not a fan of the built in Jitsi recording system because it takes your focus as a teacher away from what you are teaching and because you can not record different windows such as viewing a Writer document, then watching a YouTube video. I also do not like the extremely loud announcement that a video is being recorded which always occurs at the beginning of each recorded video.

Also I often teach courses in a two hour block so 90 minute time limit may not work. Finally, I think it is more practical to simply record an MP4 video in the first place. Both the sound quality and file size should be better. This is especially true if you want to directly upload class videos to a course YouTube channel for students and parents to review later.

I therefore recommend using an independent free open source video screen recording program called Simple Screen Recorder or SSR instead of the Jitsi built in tool. If you are using a Linux laptop, you can download Simple Screen Recorder from the Software Center. You can then set it up to record a fixed area on your laptop.

Read more: 10.3 Record a Jitsi Video Conference

10.5 How to call into a Jitsi Meet video conference

Using your phone to call into a Jitsi Meet video conference can be very useful if you are driving, have limited data, or lack access to a computer. It is also useful for those hosting a Jitsi video conference if you are expecting more than 100 participants as audio only participants take up much less band width that video participants. To call into a Jitsi Meet conference using a regular phone, all you will need is the specific meeting's dial-in phone number and its associated PIN number.

Meeting Leader Phone in Tips
Test the phone link process in advance. Open a web browser and go to https://meet.jit.si/

Enter a meeting name such as ourexamplevideoconference:

01

Click Start meeting which will go to this link: https://meet.jit.si/ourexamplevideoconference

and display this screen:

02

Click the People Plus icon to invite people:

03

Here you will find the link to the meeting and also find a dial in phone number with a PIN number. You can share either the link or the phone number or both with your members. Note that in the US, the Dial In Phone number is often the same from meeting to meeting. And the PIN number will likely be the same for each meeting if the name of the meeting does not change. But if the name of your meeting changes each month, then the PIN number to phone into the meeting will also change.

Click on the Copy Icon to copy both the phone number and the pin number into your computer clip board. Here is an example of the Jitssi Meet dial in number and a unique meeting pin number:

Dial-in: +1.512.647.1431 PIN: 4100 9020 78#

To start your meeting, if you are the leader of the meeting, arrive at the meeting a few minutes early and click Join Meeting and then click Log In to be the first person to log into the meeting. Once in the meeting, you can still find the phone number and PIN number by clicking on the Meeting Participants icon at the bottom of the screen. Then click on the Invite People Plus icon.

To join a Jitsi Meet meeting by phone, check the meeting invitation you received from the host. It will list the phone number and a numeric PIN. Alternately, you can visit the meeting link provided by opening any web browser and entering the link. (Android and Apply both provide Jitsi apps you can use too). Then before logging in, click on the People Plus icon to display the meeting phone number and PIN number. You can then close the browser app and call the provided phone number using your mobile phone or landline. When prompted, type the conference PIN followed by the pound sign (\(\#\)). You are now in the call as an audio-only participant. Press *6 on your phone's keypad to mute or unmute yourself during the call.

How to fix Jitsi Meet video and audio permission settings

Jitsi Meet is a free, open-source video conferencing tool that allows you to start or join meetings without signing up. Unlike Zoom or Google Meet, Jitsi Meet prioritizes privacy and does not store personal data. You can open a Jitsi meet video conference link with any web browser. But some people have problems getting their microphone and camera working on Jitsi meet.

If you are having problems getting either your microphone or your camera working on a Jitsi Meet video conference, it likely has to do with your web browser permission settings. To fix this problem, open your web browser and go to the meeting link. Then click the padlock icon just to the left of the word “meet” in the left side of your browser's address bar.

01

Note that both the camera and the Microphone are set to automatically blocked. Click on the icons to the right to change these settings to “using now”.

02

Then refresh the page. The video conference sign in page should now look like this:

03

Click “Join meeting.” Then once in the meeting, hover your pointer over the bottom of the screen to bring up these icons.

04

If you are still having issues with either your mic or your camera, click on the three dots to bring up the settings screen. Then click on Settings.

05

Here you can choose your audio device by clicking on the drop down arrow on the right. Click on Video to choose your camera. You can change your display name by clicking on the word Profile in the left side menu.

  • Home
  • 1 Why Switch to Linux
    • 1.1 Why Use Linux Instead of Windows
    • 1.2 Why Linux is More Secure than Windows
    • 1.3 The Fatal Flaw of the Windows Monopoly
    • 1.4 UEFI... The Microsoft Kill Switch
    • 1.5 Case Studies on Need for Better Tech Awareness
  • 2 Linux to the Rescue
    • 2.1 History of Linux Operating Systems
    • 2.2 Five Ways to Try Linux
    • 2.2 Take Linux Mint for a Test Drive
    • 2.3 Create a USB Stick with Persistent Storage
    • 2.4 Introducing DistroTweaks
  • 3 Linux Computer Options
    • 3.1 Problems with Current Computer Options
    • 3.2 Linux Coreboot Laptop Options
  • 4 Pinebook Pro Tips
    • 4.1 Initial Startup Tips
    • 4.2 Install and Simplify LibreOffice
    • 4.3 Install Additional Programs
    • 4.4 Connect a Printer
  • 5 Benefits of LibreOffice Writer
    • 5.1 Why Libre Writer is better than MS Word
    • 5.2 Simplify Libre Writer
    • 5.3 Add Extensions to Libre Writer
    • 5.4 Create your own Custom Template
  • 6 How to Use LibreOffice
    • 6.1 Create Custom Colors and Gradients
    • 6.2 Create a Diagram with Libre Draw
    • 6.3 Create a Chart with Libre Calc
    • 6.4 Make a Presentation with Libre Impress
  • 7 Manage Linux
    • 7.1 Backup Your Programs and Settings
    • 7.2 Back Up Documents with USB and Mega
    • 7.3 How to Find and Remove Duplicate Files
    • 7.4 How to Use Mint Workspaces and Rollups
  • 8 Linux Security Tips
    • 8.1 Linux Security Awareness
    • 8.2 Linux Security Tools
    • 8.3 Get a More Secure Email Address for Free
    • 8.4 Use TOR... a More Secure Web Browser
  • 9 Final Steps to Freedom
    • 9.1 Free Alternatives to Windows Programs
    • 9.2 Set Up a Free Email Organizer
    • 9.3 How to Run Windows Programs in Linux
    • 9.4 How Will Knowledge be Shared in the Future
  • 10 Secure Video Conferencing
    • 10.1 Why Jitsi for Secure Video Conferencing
    • 10.2 Use Jitsi Breakout Rooms
    • 10.3 Record a Jitsi Video Conference
    • 10.4 How to fix Jitsi Meet video and audio permission settings
    • 10.5 How to call into a Jitsi Meet video conference
  • NEWS
    • The Fight for a Secure Linux BIOS
    • Hidden Dangers of Ryuk Ransomware
    • Did Lilu Ransomware Really Infect Linux Servers
    • False Accusations Against Linux Security Continue
    • Why and How to Do Your Taxes with Open Tax Solver