A USB External Drive with Persistent storage is also called a Computer on a Stick – because it works exactly like a computer with an internal hard drive. The only difference is that a computer on a stick does not have a keyboard and monitor. It therefore borrows the monitor and keyboard of the “host” computer which it is plugged into. When you work with programs and save documents, instead of using the host computer internal hard drive, you use the USB external drive to run programs and save documents.
The benefit of having a computer on a stick is that you do not have to actually change anything other than a couple of BIOS settings on your host computer to allow it to boot from an external drive rather than its internal drive. This means you can keep your Windows computer just the way it is and still use a Linux “computer-on-a-stick” to learn how to use Linux and/or to set up a Linux web development test environment.
A Linux USB without persistent storage is called a Live USB and is normally used to replace the prior operating system on the hard drive (either Windows or Linux) with a newer version of a Linux operating system. You can start a computer with a Live USB and do things like installing programs, saving files, and changing settings. But, as soon as you turn off and turn on your computer, all your changes you made with the Live USB will be gone.
If you want a USB drive that retains the changes you make, you need to create a USB with persistent storage – a computer on a stick. With persistence, whenever you boot the USB drive on any computer, your files, settings, and installed programs will be there. This allows you to take your work with you and work on almost any computer anywhere anytime. A Persistent USB also allows folks to learn about Linux on their existing computer without the need to create virtual machines or dual boots.
This method of creating a computer on a stick is ideal for teachers and students because it allows them to use a school’s computer lab without altering in any way any of the computers in the lab. Students can save their work and bring their Linux Mint Persistent sticks home and continue to practice using Linux on any computer they may have at their home.
But the most important reason to create a persistent USB drive is that you can test Linux based business website development programs without ever having to worry about borking your normal computer. This is why creating a computer on a stick is called setting up a TEST environment. If things go bad, you simply reflash the USB drive and start over. In this article, we will review the steps for creating a computer on a stick.
Obtain an External USB Drive or SSD Drive
You’ll need a USB drive with enough storage capacity to set up persistence. The least expensive option is to buy a USB 3 drive with at least 64 GB of storage . Since the Linux Mint operating system takes less than 15 GB of storage, you can use a 32 GB USB 3 drive. However, the bigger the USB drive, the more persistent storage you can have. Also, the more storage you have on the drive, the longer it will last. Amazon has 64 GB Sandisk USB 3 drives for as low as $12 each. The problem with these small USB drives is durability. Do not expect them to last more than a couple of years when running a full operating system. A more durable option is to buy an External USB SSD.
NewEgg has an Adata 240 GB External SSD for $35. Amazon has an Orico 128 GB NVME External SSD for $46. Best Buy has a SanDisk USB 3.1 250 GB External SSD for $73. Any of these external USB drives would last about 4 times longer than a USB stick. In other words, if a USB stick lasts 1 to 3 years, a USB SSD External drive will last 4 to 12 years depending on how often you use it, how much data you put on it and how often you delete and replace data.
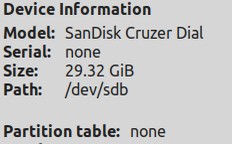
Here is an image showing the difference between a USB stick and external USB Drive:
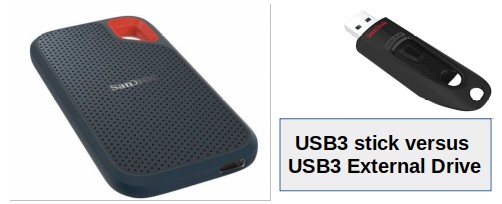
Note that you will also need a 16 GB USB stick to use as a simple non-persistent Live USB during the install process. These cost less than $10 and can be re-used to create several persistent drives.
UEFI Boot and GPT versus Legacy BIOS Boot and MBR
In addition to USB sticks versus USB external drives, there are several other different categories of USB Persistent drives. A huge difference has to do with the type of boot loader built into the host computer used to create the persistent drive. Many older computers use a boot loader based on BIOS (Basic Input Output System). BIOS in turn divides a hard drive up into partitions using a Master Boot Record or MBR Partition Table. Most newer computers use a boot loader based on UEFI (Unified Extensible Firmware Interface). UEFI is extremely complex – being about 20 times bigger than BIOS. UEFI divides a hard drive into partitions based on a Global ID Partition Table (GPT).
If you use a BIOS computer to create your external drive, you will likely wind up with a BIOS based external drive using an MBR Partition Table. This drive will likely not be recognized by a newer computer built on a UEFI GPT foundation. If you use a UEFI based computer to create your external drive, you will likely wind up with a UEFI based external drive using a GPT Partition Table. This will likely not be recognized by an older computer built on a BIOS MBR Foundation.
Some older computers can be set for either Legacy or UEFI boot. If this is the case with your computer, set it for Legacy Boot or BIOS Boot as UEFI boot can have problems with the Boot loader for the Persistent stick over-writing the boot loader for the UEFI computer.
There is also a way to create external drives that will boot to either a BIOS or UEFI computer. These are called Hybrid USB External Drives. However, hybrid drives may not be recognized by some UEFI based computers.
Danger of UEFI Boot Loader Hijacking
Boot loader hijacking is a problem with UEFI host computers where the USB Live stick mistakenly replaces the boot loader of the host computer with the boot loader of the USB Live Stick during the external drive creation process – even though the boot loader should actually just be copied to the USB persistent external drive. This results in the host computer no longer being able to start!!!
Also, with UEFI host computers, the installer might place an entry in NVRAM (non-volatile random-access-memory) pointing to the Grub Boot loader on the USB drive rather than the actual Grub boot loader on the Host computer. If this happens, the host computer will no longer boot without the external USB attached! This does not occur on older BIOS based computers. But it is common on UEFI computers due to the extremely complexity of UEFI. The problem here is that UEFI is a monster. At some point, we all need to stop using UEFI computers!
In the meantime, there are ways of working around this UEFI problem. We discuss some options below. But it requires extreme precaution to avoid having the USB live stick hijacking the boot loader of your host computer. If this happens, it may be very difficult to start your host computer again and may even require rebuilding your host computer. This is why you should always back up all of the data and programs on your host computer before using it to create a Persistent USB. None of this applies to creating a simple Live USB used to reflash computers. This only applies to creation of USB drives with persistence.
Persistence with Casper Partition or Persistence with Full Install
Many Persistent USB stick creation tools will create a separate partition called a Casper partition. While this may seem like a good idea, this method has problems because it will not help you learn the default Linux Mint File System. Since our primary reason for creating a persistent USB is to learn the Linux way of doing things, we will use the full install method (also called a direct install).
It should be noted that the full install method is much more durable than the Casper method. Also the full install method allows you to update the operating system and programs over time because the file structure is nearly identical to a normal Linux Mint install. Finally, a full install tends to work better on nearly any host computer. The only problem might be if your computer has proprietary drivers. You may need to do a bit of research on how to install these drivers to your full install USB drive. The full install is also more secure than the Casper partition install. Finally, if you have problems with a particular program working in your website development test environment, you are more likely to find a solution on one of the Linux forums because there are huge numbers of people using full install Linux computers versus only a few people using the Casper partition method. Either way, you should always backup any data you have on your persistent USB drive as well as backing up any data you have on your host computer as any persistent storage might get destroyed during the website development process.
Back up your data on your computer
There is always a chance of something going wrong during the persistent USB install process. You should therefore always back up your data and programs on your host computer to an external drive before doing this process. So you really need three USB drives:
#1 for a copy of all of your Host computer files and programs. $20 at least 64 GB
#2 for your Live USB stick. $10 16 GB
#3 for your Persistent External USB Drive (computer on a stick). $20 to $70 at least 64GB.
Now that we have 3 USB drives, and have used one USB to create a copy of all of the documents and programs on our host computer, let’s review the Full Install process for creating a persistent USB drive.
During this process, you will learn not only how USB drives are formatted into parts called “partitions” but how all computer drives are structured and partitioned.
Homework Assignment #1: Learn Why You Should Use Linux for your Web Development Test Environment
While this external drive creation process can be done on a Windows laptop, it is best to use a Linux laptop. This is because Windows computers, all of which run on UEFI, are designed to sabotage drives and install hidden back doors into hard drives. For more on the problems of UEFI and Windows computers, see the following article: https://learnlinuxandlibreoffice.org/news/the-fight-for-a-secure-linux-bios
For information on how ransomware uses Windows back doors to destroy businesses, see this article: https://learnlinuxandlibreoffice.org/news/hidden-dangers-of-ryuk-ransomware
Also, watch the following video which is a summary of the above article and based on it: https://www.youtube.com/watch?v=mEPcRFvvekY&t=10s
And if you want the full story on why you want to learn Linux, I have written a free 400 page book that explains the security problems of Windows computers. You can download and read this book at this link: https://freeyourselffrommicrosoftandthensa.org/
Here are a couple of additional videos I have done about problems with the security of Windows computers and the benefits of switching to Linux: https://www.youtube.com/watch?v=JJIxIe_LZn4
https://www.youtube.com/watch?v=vZWx-c8gvmA
Hopefully after reading some of these articles and watching some of these videos, you will have a clearer understanding of the need to learn Linux if you want to build and or run your own business website.
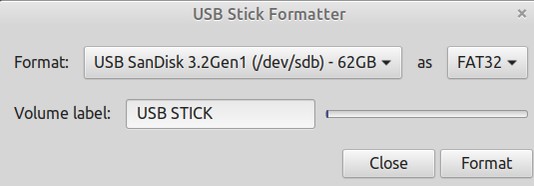
Step 1 Format all three of your USB drives
Make sure the USB 3 you will turn into a Persistent USB Drive is properly formatted. Note this process will wipe out any data on the USB 3 drive. Insert the USB 3 drive into your Linux Laptop. Open the Linux Mint USB Formatter and select the USB drive.
Install and Use Gparted
Gparted is a free open source Partitioning program. To download it, open the Mint Software Manager and type Gparted into the Search Box. Then click Install. Then open Gparted by going to Mint, Administration, Gparted.
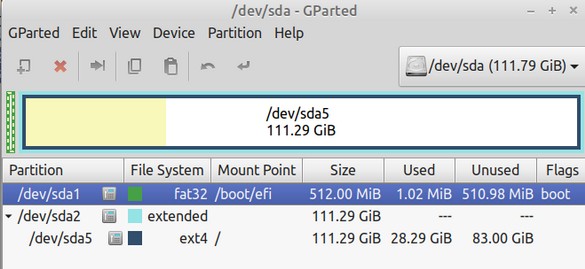
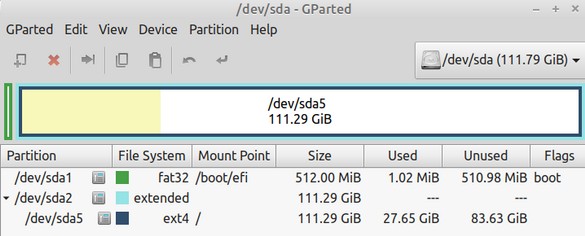
The screen opens to our internal hard drive which is called sda. This screen shows that sda has three partitions, sda1, sda2 and sda5. Sda1, which is the internal drive boot partition is mounted at boot/efi. But note that the flag for this partition is just boot, not boot, efi. Flags are important as we will see later. Note also that the partition called sda5 uses the ext4 file system and is mounted at forward slash / which is also known as root. This is the partition that holds all of our programs and documents.
What this screen does not clearly show is that our internal hard drive is using a MBR partition table. Partitioning experts would know this must be true because only MBR tables use “extended” partitions. Another way to confirm that the table is an MBR table is to click on View, Device Information in the top menu.
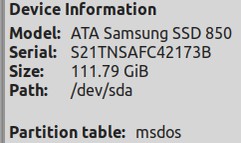
It says the Partition table is msdos. This is what Gparted uses for the name of MBR tables. If it would have been a GPT table, it would have said GTP instead of msdos. To see our USB external drive, click on the drop down arrow in the upper right corner and click sdb.
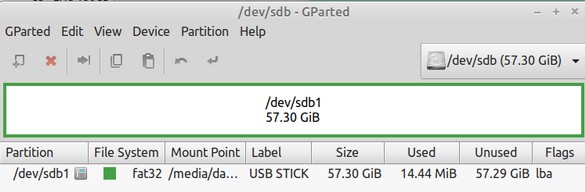
The drive called sdb has only one partition. It is called sdb1. It has a flag called lba. LBA stands for Logical Block Addressing which is kind of meaningless since both MBR and GPT tables use logical block addressing. Now that we know what happens when we format a new USB drive, repeat the above formatting process to reformat your other two USB drives.
Step 2: Back up your documents and programs on one of your USB drives
This involves placing all of your documents in folders and then copying each folder to your backup USB stick. Then type up a list of all of your important programs and copy this list to your USB backup drive.
Step 3 Download the Mint ISO file
First download the Linux Mint Cinnamon Iso from this page: https://linuxmint.com/edition.php?id=281
Step 4 Create a Non-persistent USB Live Stick
The Full Install method involves creating a simple USB live stick with the Linux Mint Image Writer. This stick does not need to be more than 16GB in capacity. Whether using Etcher or Mint Image Writer, the process is the same. Select the ISO image in your Downloads folder. Then select the USB drive after inserting it into your host computer. When done, unmount and remove the drive from your host computer.
Then while your host computer is still on, reinsert the Live USB you just created and open Gparted again.
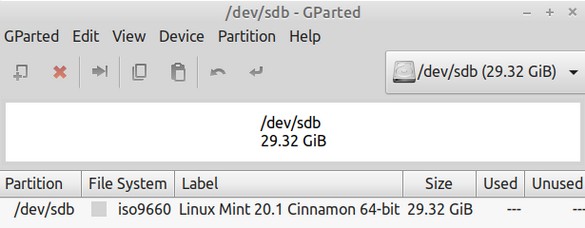
What is interesting about a Mint Live USB is that it has no partitions. To confirm this, click on View, Device Information.
Now that we understand the partition set up of our internal drive and our three external drives, right click on the Live Stick and click Safely Remove Drive. Then turn off your laptop.
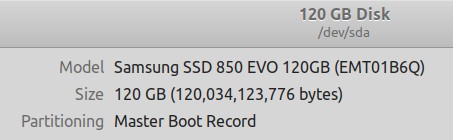
Step 5 Determine if your Host computer is a UEFI GPT computer or a BIOS MBR computer.
Unless you are using an older Windows 7 computer, or a Chromebook computer, or a Coreboot computer, or the new Pinebook Pro laptop, the odds are your computer is using UEFI and GPT. All Windows 8, 9 and 10 computers are UEFI computers. All recent Apple computers are UEFI. Knowing the type of firmware and partition table you have is important because it will affect the steps you should take to create your USB external drive. On a Windows computer, click on This PC icon in the desktop, then Manage, then Disks Management. On a Linux Mint computer, click on All Applications, Disks.
Here is what this looks like on an old Dell Windows 7 laptop I converted to Linux Mint:
Step 6 Decide what type of External Drive you want to create
The remaining steps depends on what type of computer you have and what type of external drive you want to create. In this article, we will cover 3 cases:
Case #1: BIOS Host computer and BIOS Target USB Drive.
Case #2: BIOS or UEFI Host computer and UEFI Target USB Drive
Case #3 UEFI Host computer and Hybrid Target USB Drive
The easiest process is to use a BIOS host computer to create a BIOS USB drive. The drawback of this option is that your USB Drive will not work on any newer Windows or Apple computer. This is because the drive will use a Master Boot Record Partition Table and newer Windows and Apply computers can not read such partition tables. The big advantage is safety in that you do not need to worry about UEFI Boot Loader Hijacking – because BIOS computers do not use UEFI.
The second case is using a BIOS or UEFI host computer to create a UEFI USB drive. The drawback of this option is that your USB drive will not work on anything but a newer Windows or Apple computer (and it may not work on Apple). We will show you a simple way to avoid UEFI Boot Hijacking. But I personally do not like this option as for computer security reasons, we should all be working on moving away from UEFI.
The third case is using a UEFI Host computer to create a Hybrid USB drive. The drawback of this method is that it is more complex. But the benefit is that you can use your USB drive in almost any computer (with the possible exception of Apple computers and some UEFI based computers that fail to recognize a Hybrid external drive). We make this possible by adding boot loaders for both BIOS and UEFI computers.
If you have a UEFI based computer which does not recognize your hybrid drive, then your only option is to create and use a UEFI based USB external drive.
Here are the steps for each of these cases:
Case #1 Step 1 Set your laptop to boot from a USB drive
This is done by entering the BIOS of your laptop – typically pressing F2 immediately after pushing the Power On button. The BIOS is also where you might be able to change from UEFI boot to Legacy boot. The actual BIOS changing process will vary greatly from one model to the next. For more information about entering BIOS for your laptop, to a Search in any Search engine. Go to the Boot Sequence section of your BIOS and change it to start from a USB Drive instead of your computer’s internal hard drive. Then Save and Exit the BIOS.
Step 1.2 Start a Live Session on your computer
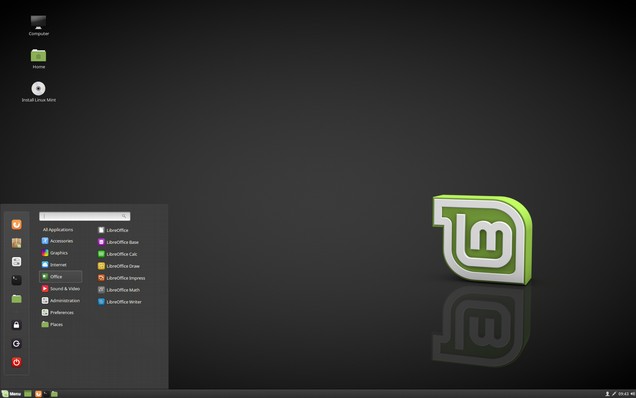
Use your non-persistent USB Live stick to start a Live Session. If your computer has USB 2 ports and USB 3 ports, the USB 2 ports are usually on the right. Put your non-persistent live stick on the right port so that later you can put your USB 3 external drive into the left port. Here is what the Linux Mint screen will look like after starting it with a live USB:
Connect to the Internet by clicking in the lower left corner. Then turn off the screen saver by clicking on the Mint circle in the lower left corner. Then click on Settings which is the third icon from the top. Then clicking on Screen Saver and changing it to Never. Then insert the already formatted USB 3 external drive you want to place persistence on into a USB port on the left side of your computer.
Step 1.3 Start the Mint Installer
Start the Mint Installer by double clicking on the small circular icon on the left side of your screen. Select language and keyboard; install third party software. If there is a screen asking you whether to unmount the USB drive: Unmount Partitions that are in use? Dev/sdc… Do you want the installer to unmount? The correct answer is yes.
Step 1.4 Installation Type Screen
This is where the BIOS Hijacking can occur. So go slow here. If you are certain your host computer is a BIOS computer with an MBR Table and you want to create an External Persistent Drive which is also BIOS, then go ahead and select “Erase disk and install Mint.” Then click “Install now.” Do not worry that you have not been able to select the drive yet. That question is on the next screen which is called Erase Disc and Install Mint. Use the drop down arrow to change the target from sda to sdc. (if you do not see this option and the screen says Mint will be installed on sda, then CANCEL the operation).
Step 1.5 Finish the Mint Installation
Assuming you have selected sdc, click Install Now. The next Double Check screen says that “The following partitions will be formatted.“ Check that these partitions are all sdc. Then click Continue. The next screen will be the Time Zone. Then your username. Keep it simple and keep the password simple and change the setting so that you log in automatically. There is no need to encrypt the drive. Then click Continue to finish the Installation.
Step 1.6 Shut down is better than Restart
Regardless of the type of external drive you are creating, once the install is complete, your will be asked to restart. But do not restart. Instead, close the screen and shut down the computer completely. Once shut down, you can now remove both USB drives and reinsert just the new persistent external USB drive.
Step 1.7 Test your BIOS Computer on a Stick
After your computer has powered off, remove your external USB computer on a stick and re-insert it. Then Power On, press f2 to make use that your BIOS is set to boot from a USB and then press Save and Exit which will start the USB and open at the Mint Start screen. Make some changes and then shut down the session. Then remove and reinsert the external USB drive. Then start your computer to verify that all of the changes you made were saved. You should now be able to take your Persistent USB and use it to run any computer where the BIOS is set for Legacy Boot and is set to install from USB first.
Case #2: BIOS or UEFI Host machine and UEFI Target USB Drive
This is where the BIOS Hijacking is likely to occur. So we need to go slow here. Do not follow common online solutions as it will likely bork your host computer. What we need to do is protect your hard drive UEFI settings from being over written by the USB Live stick during the install of Linux Mint to your Target External USB Drive. What has been recommended in the past is unscrewing the back of your laptop and removing the internal hard drive. But this also has risks. Thankfully, there is a better way to protect your UEFI internal hard drive
Case #2 Step 1 Set your laptop to boot from a USB drive
Enter the BIOS of your laptop – typically pressing F2 immediately after pushing the Power On button. Go to the Boot Sequence section of your BIOS and change it to start from a USB Drive instead of your computer’s internal hard drive. Then Save and Exit the BIOS.
Step 2.2 Start a Live Session on your computer
Use your non-persistent USB Live stick to start a Live Session. Then click on the Mint Menu and open Gparted. This partitioning tool is not installed normally in Mint but it is included in the Mint USB Live Stick. We will use Gparted to help us understand the partitioning of our host computer internal hard drive and set up partitioning for our external target USB drive.
Here is what the Linux Mint screen will look like after starting it with a live USB:
SDA is our host computer internal drive. SDA1 is the first partition on this drive. Note that while the mount point has been set for boot/efi (implying that this is a UEFI set up with a GTP table), the Flags column only shows a boot flag and not a efi flag. Also, SDA2 is an extended partition. This indicates that it is a BIOS set up with a MBR Table. But we still need to protect it from UEFI Boot Loader hijacking. To do this, we will delete the Boot flag on the first partition to prevent UEFI from seeing this boot partition.
Step 2.3 Unflag SDA1 Partition Boot Flag
Left click on sda1 to select the sda1 partition. Then right click and click Manage Flags.
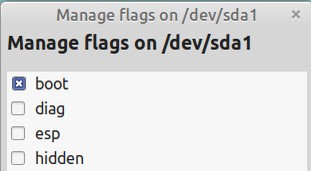
Then uncheck the boot flag (if MBR partition) or delete the boot and esp flags (if GPT partition). Then close Gparted. With the boot flags removed, the Mint installer will not recognize the EFI partition. Instead, it will installs the boot loader called Grub2 on the external USB drive.
Step 2.4 Run the Mint Installer
Start the Mint Installer and run through the screens exactly like a BIOS install. If the installer asks whether to force installation in UEFI, cautioning this may create a conflict, answer “yes.” This means the installer has detected the internal drive’s operating system and noticed there’s no active EFI partition. The installer does not know that we are going to restore the internal EFI partition’s boot flags at the end thus resolving this conflict. Select “Erase disk and install Mint.” Then click “Install now.” On the next screen which is called Erase Disc and Install Mint. Use the drop down arrow to change the target from sda to sdc. (if you do not see this option and the screen says Mint will be installed on sda, then CANCEL the operation).
Step 2.5 Restore Boot Flags
After Install: Do not click either Restart or Shut Down! After the install is complete, you need to click Continue. Then open Gparted again. Right click on the EFI partition. Then click Manage Flags. Then check the boot and efi boxes (assuming they were both clicked before). If it is an MBR table, then just check the Boot Flag. Then shut down your laptop and remove the Live USB at the prompt.
Step 2.6 Test your UEFI USB Drive
Insert your USB Drive into the host laptop and turn on the power. Press the F2 button to enter BIOS. Then change the BIOS mode from Legacy to UEFI. But do not turn on Secure Boot. Then save and exit BIOS. Your USB should open to the Mint Start screen.
Case 3 Hybrid External Drive using a BIOS Mode host computer set to UEFI Mode
The most versatile option is to create an External USB Drive that will work with either a BIOS or a UEFI computer. Perhaps you have several computers around the house and some are BIOS and some are UEFI. Or you are creating an External Drive for a friend and you do not know whether they have a BIOS or UEFI computer to run the external drive on. In this case, to create a Hybrid External Drive, we need to create two boot loading partitions instead of just one.
Case 3 Step 1 Set your BIOS to Boot from UEFI Mode
Ironically, the easiest way to create two boot loaders is to set your host computer to boot from UEFI. This will allow the Mint Installer to do the hard part which is correctly creating the UEFI partition. We can then easily add a BIOS Boot partition at the very end. Insert your Live USB and then power on your host computer. Press F2 to enter BIOS. Then change the Boot Sequence from BIOS to Legacy. Do not turn on Secure Boot. Then click Save and Exit.
Step 3.2 Special Hybrid Partitioning
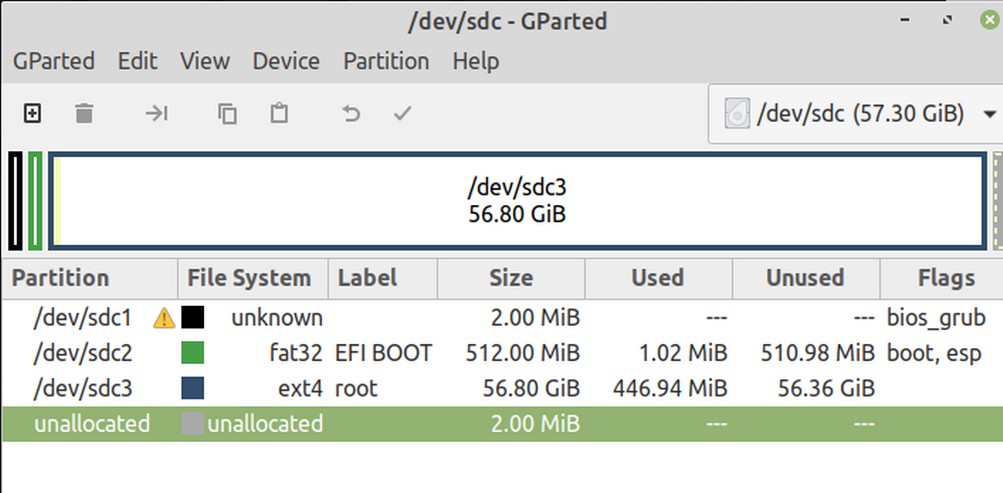
After starting your host computer with the Live USB Mint stick inserted, and reaching the Mint Start screen, connect to the Internet and turn off the screen saver. Then open Gparted. Then insert the target USB. Then close and open Gparted again. This will leave the target inserted but unmounted. Gparted will start with a screen showing the partitions of your internal hard drive, which is typically called sda. You can access the partitions for either of your USB drives by clicking on the drop down arrow in the upper right corner. Because the USB Mint Live stick was inserted first, it will usually be called sdb and your external target USB drive will be called sdc. Here is sdc with one partition.
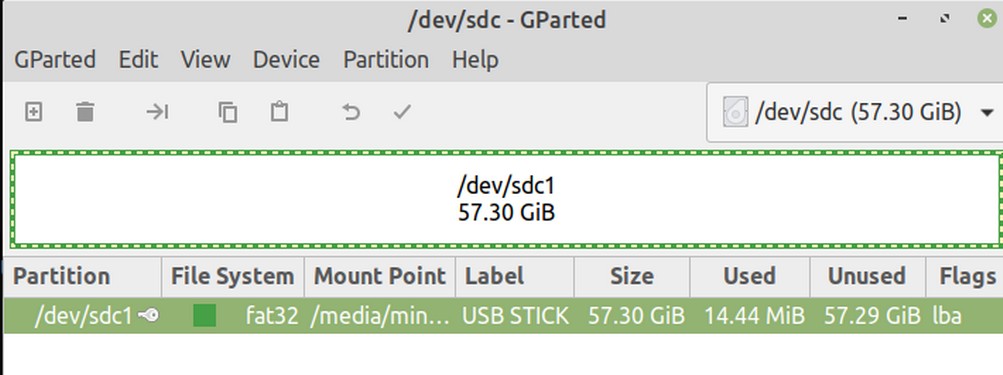
Click on View Device Information in the top menu and note that the Partition Table is msdos meaning that it is an MBR Table. Making sure that you have selected Device sdc in the upper right corner, click Partition Unmount to unmount this partition if it is mounted. The label will change to USB Stick.
Step 3.3 Change the SDC Partition Table from MBR to GPT
We will first change the target drive partition table from MBR to GPT. From the Gparted Top Menu, select Device: Create Partition Table: gpt type (the UEFI format). There will be a warning screen telling you that everything on the sdc drive (also known as a disk) will be erased. Use the drop down arrow to change from msdos to gpt.
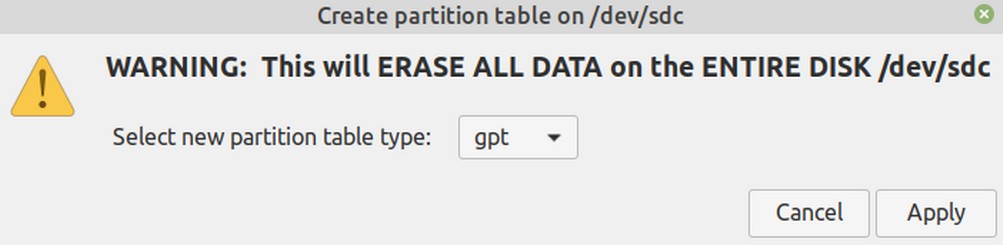
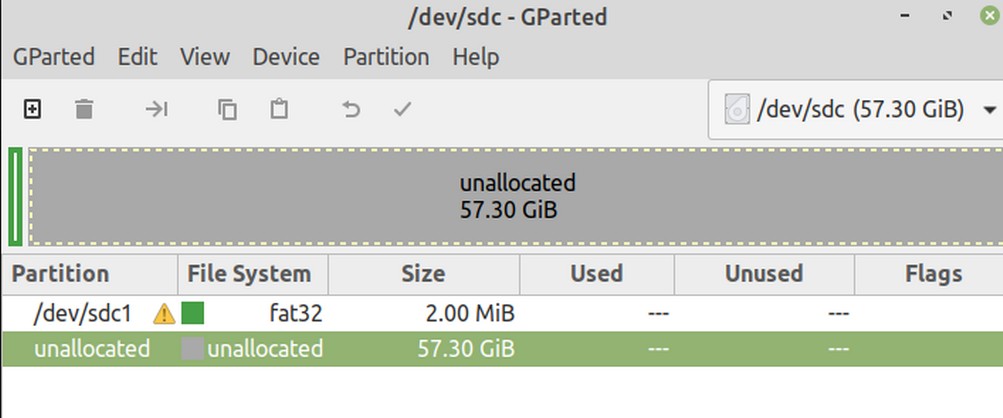
Then click Apply. The screen will now show a single partition called unallocated which is selected.
Why we need a BIOS boot partition in our GPT Table
Since GPT partitioning has no traditional MBR, the bios_grub partition provides a place for Grub to store the boot loader information that would normally be stored in the MBR. The actual GPT boot loader, called Grub2 will be installed to the drive typically named sda, not to the partition typically named sda1.In our Hybrid USB Drive, Partition #1 is called a BIOS boot partition. It’s standard procedure for using a gpt table in BIOS. The BIOS boot partition is a partition on a USB data storage device that GRUB uses on BIOS-based computers in order to boot an operating system, when the actual boot device contains a GUID Partition Table (GPT). Such a layout is sometimes referred to as BIOS/GPT or Hybrid boot.The BIOS boot partition in GPT is similar to the EFI System Partition (also known as ESP). The EFI System partition holds a file system and files used by the UEFI, while the BIOS boot partition is used in BIOS-based systems and accessed without a file system by holding raw binary code.
We will create three new partitions:
#1: A Bios Grub Partition 2MiB (unformatted, at very bottom of drop down menu);
#2: An EFI System Partition 300MiB (format fat32). This will become our UEFI boot partition
#3: A Root Partition [remaining space] (format ext4).
Note that while many tutorials recommend also creating a swap partition, this is no longer needed on newer versions of Linux Mint. Also note that while many tutorials recommend creating a Home partition, there are drawbacks to this extra partition in the case of a Hybrid external drive. We will therefore just create this very simple partition system.
Step 3.3 Create First Partition as Bios Boot partition
Since the Bios Grub partition is just a place at the beginning of the drive for Grub to put stuff, it can be left unformatted. It also does not need to be very big. 2 MiB is big enough. Here is what your initial GPT table will look like with entirely unallocated space:
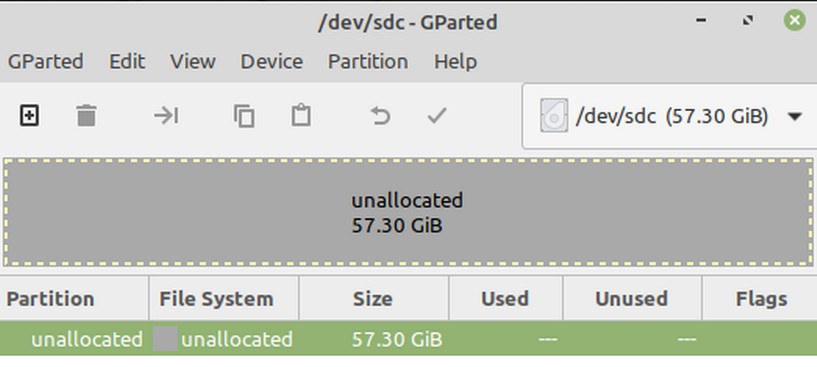
After creating your GPT partition table, right click on the unallocated space line and click the plus sign to create a new partition.
Free space before: leave at default which is 1. Type in a New Size of 2 MiB. Create As: Leave as Primary Partition. Partition Name: Leave blank. File System Type: Make it unformatted (which is the very last option in a very long drop down list).
Label: Leave blank as unformatted partition can not have a label.
Here is what this new partition creation screen looks like:
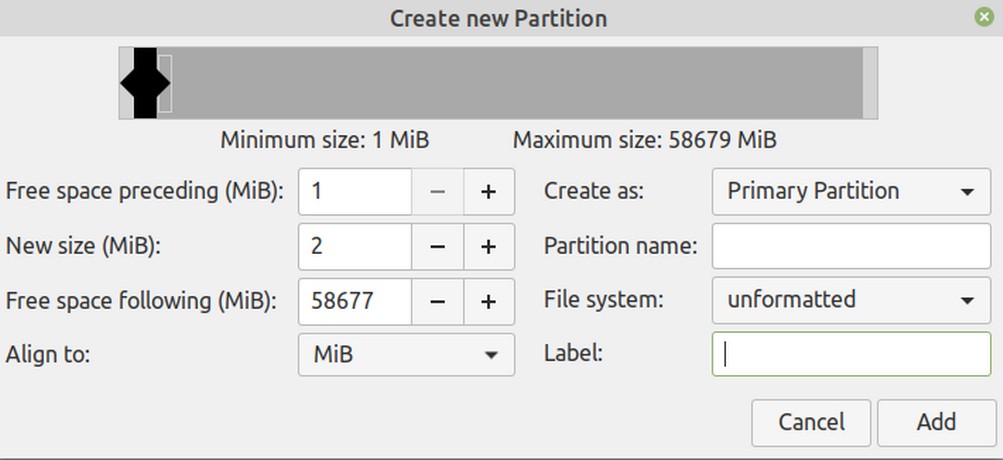
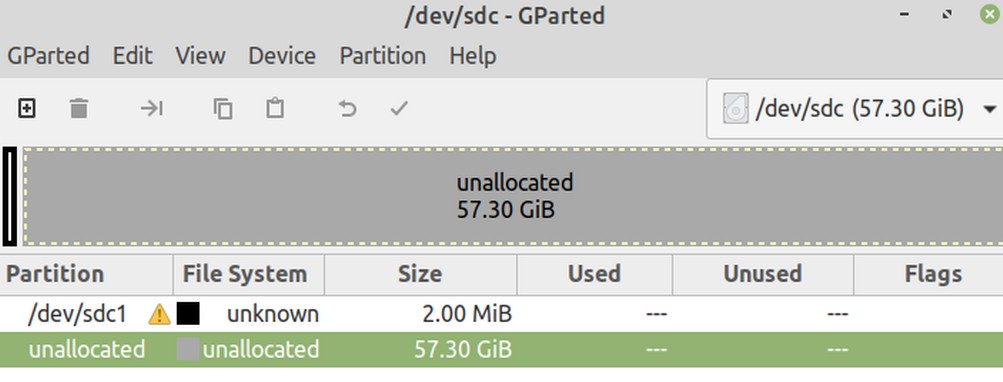
Click Add. Then click on the Checkmark Icon to apply this change. A window will pop up asking you to confirm. Click Apply. Currently, Gparted turns this partition into a FAT32 partition with a warning.
We do not want FAT32 for this partition. We want unformatted. Right click on the partition and then click Format to and select cleared. Then click on the check mark to apply the change.
The yellow warning can be ignored. Now right click on this first partition and use Manage Flags to set the boot flag for bios_grub. Then click OK.
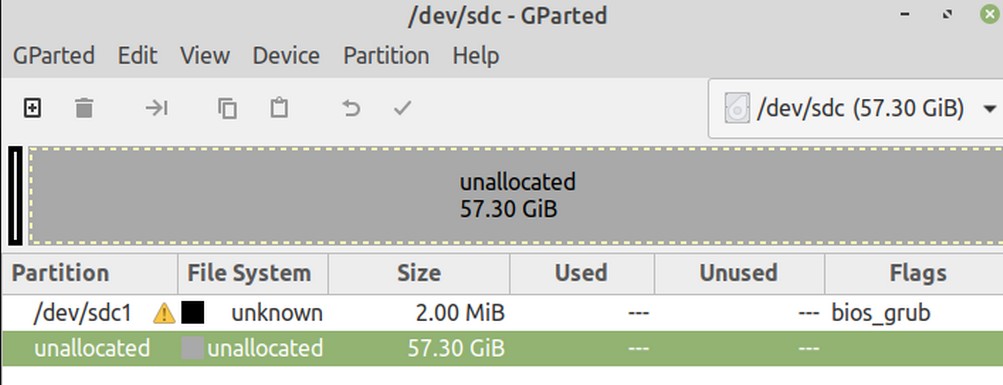
(note: if bios-grub is not one of the boot flag options, then you have accidentally set up an MBR Table rather than a GPT table. If this is the case, start over and create a GPT table).
Step 3.4 Create Second Partition as a EFI Boot Partition
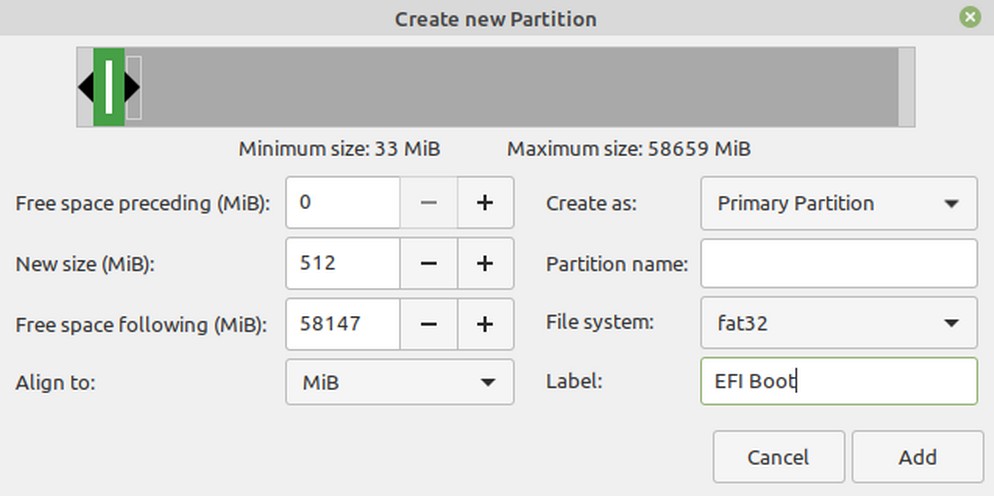
Also known as an EFI System Partition or ESP. This will become our UEFI boot partition. 512 MiB is way more than the actual space needed. But some books claim that this space may be needed over time. So we will add it. Right click on the unallocated space line and click the plus sign to create a new partition.
Free Space Preceding: 0. New Size 512 Partition Name: Leave blank
File System Type: Fat32 Label: EFI Boot
Here is what the new partition creation screen looks like:
Click Add. Then click the Checkmark to Apply the change.
Here is what our screen looks like after creating the second partition.
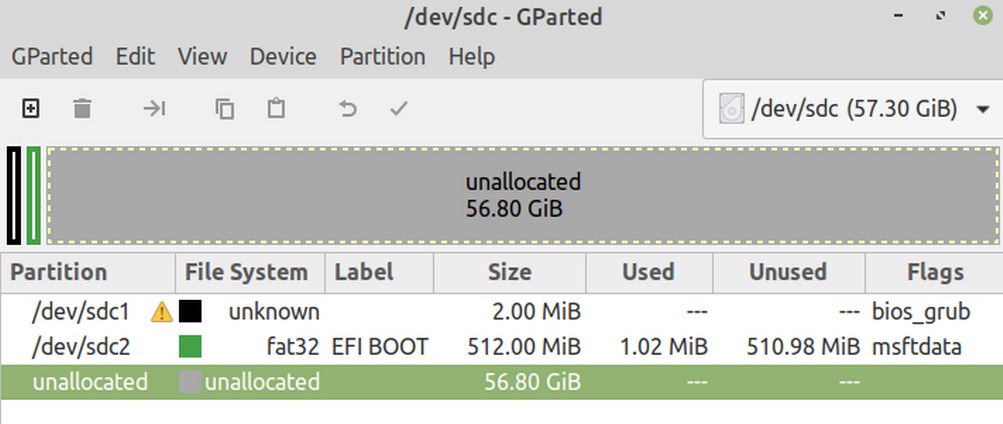
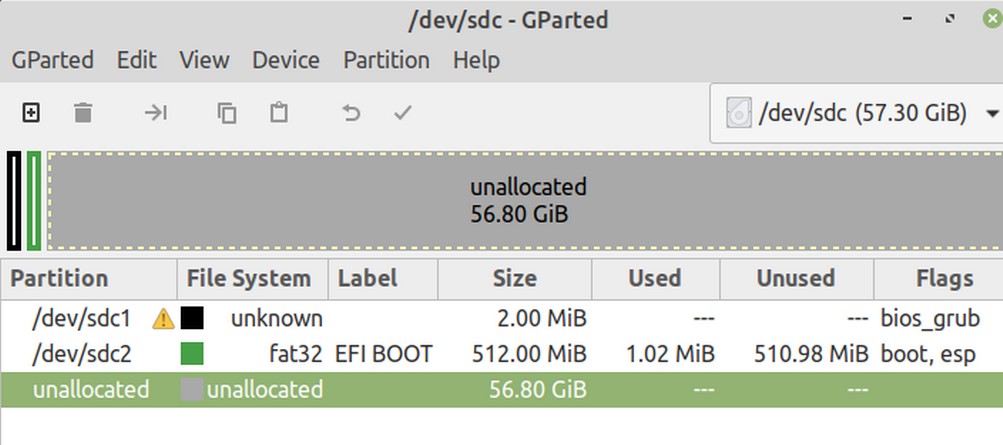
Right click and Manage Flags to add esp and boot flags.
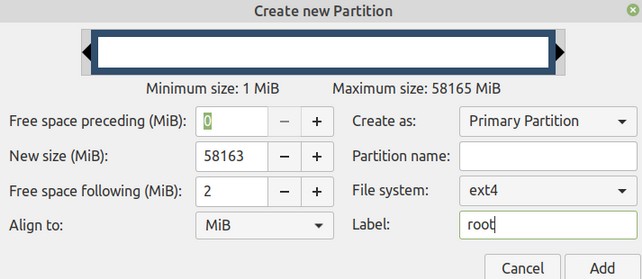
Step 3.5 Create our third partition as a Root Partition
Right click on the unallocated space line and click the plus sign to create a new root partition. Free Space Preceding: 0
New Size: All except 2 MB Remaining Space: 2 MB
Note: When you make the final partition, leave 2 MB free (unallocated) at the end of the drive. This area is used by GPT partitioning to store a backup copy of the partition table.
Partition Name: Leave blank
File System Type: Ext4 Label: root
Here is what the new partition creation screen looks like:
Click Add. Then click the Checkmark to Apply the change.
Here is what our screen looks like after creating the third partition.
Step 3.6 Unflag sda1 (Internal Hard Drive) partition
In upper right corner, change from sdc to sda. Here is what our sda partition should look like:
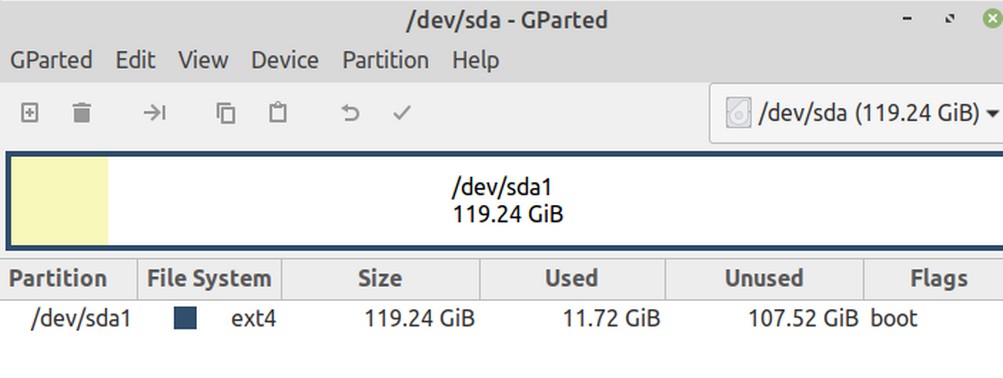
SDA1 is set for just the boot flag as the live stick was created using BIOS mode host computer. The problem is that once UEFI sees this boot partition during the installation, it is going to want to hijack and replace the internal hard drive boot loader with the Live Stick boot loader and that will prevent your internal hard drive from even booting in the future!
Right-click on the sda1 partition and uncheck boxes for boot (and esp if this partition was made with UEFI). GParted will either leave the flag space blank or assign the msftdata flag instead.
Now that we have our custom GPT partition table, close Gparted.
Step 3.7 Mint Installation to the Target External Drive
Start the Mint installer by double clicking on it. Choose English for the language. Then click Continue. Choose English US for the Keyboard layout. Click Continue. Check the box to install Multimedia Codecs. Then click Continue. For Installation Type, choose Something Else:
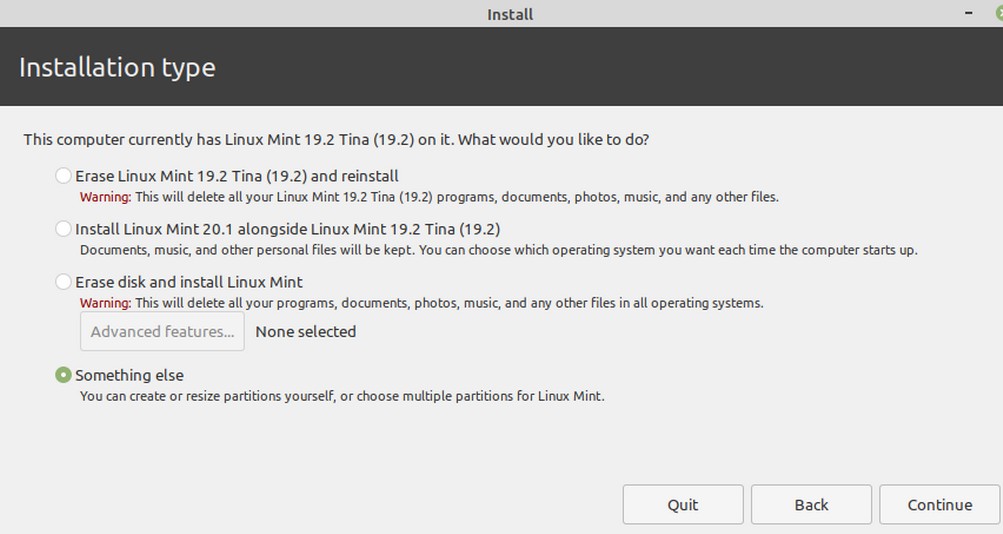
The partitions screen will appear:
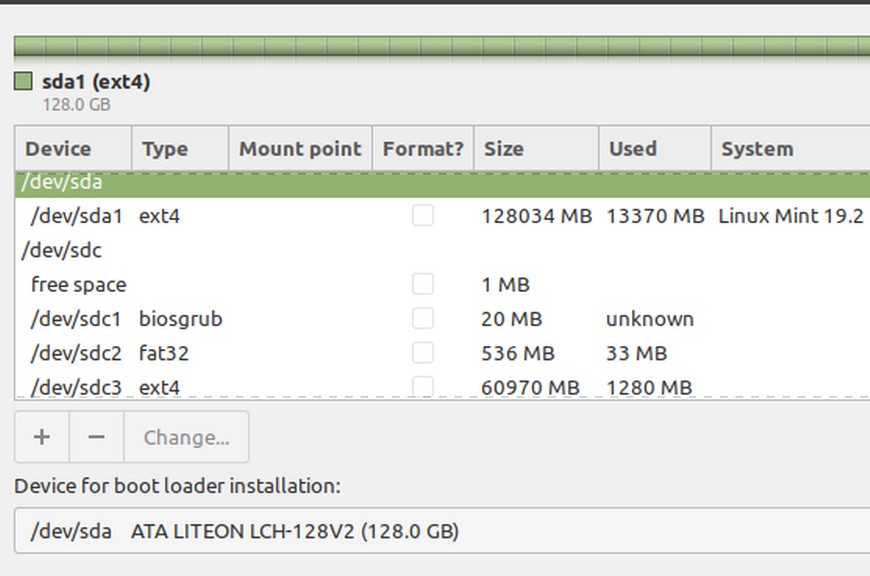
Select your external drive root partition you just created ( which is likely sdc3). Click Change to bring up the Edit Partition screen:
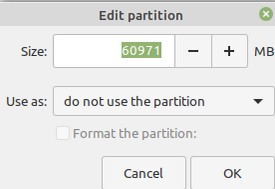
Use the drop down arrow for Use As to change the formatting from Do not use to Ext 4. This will bring up the Mount Point box. Change the mount point to forward slash / which means root.
Do not check the format the partition box as we already did this when we created the partition with Gparted.
Here is what the Edit Partition screen now should look like:
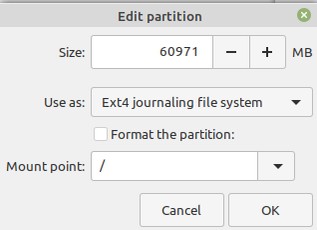
Then click OK. Then click Continue. Note that this adds the / mount point to your root partition.
Step 3.8 Change the Boot Loader Location to your EFI Partition
Most important, for Device for boot loader installation, change the boot device from dev/sda to sdc2 for the boot loader. This will install Grub 2 to the EFI partition.
Note: There is no need to set the sdc2 partition mount point because the installer will do this automatically set the mount point during the first boot using this partition as long as the host computer has been set for UEFI.
Step 3.9 Finish Mint Installation
Click Install Now. There will be a warning screen about sdc3 partition not being marked for formatting. Click Continue. Also click Continue at the second warning screen. This will bring up the Where are you screen. Set for your Timezone and click Continue. This will bring up the Who are you screen. Enter your first name and enter your password twice and change the log in to log in automatically. Then click Continue.
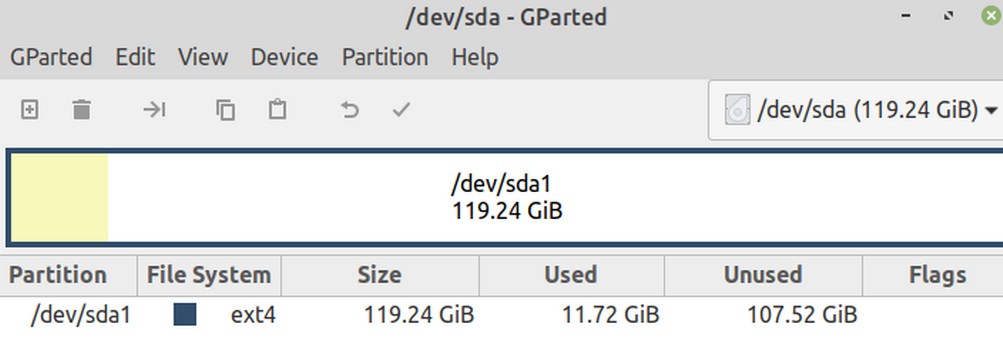
Step 3.10 Reset the Internal Drive Boot Flags
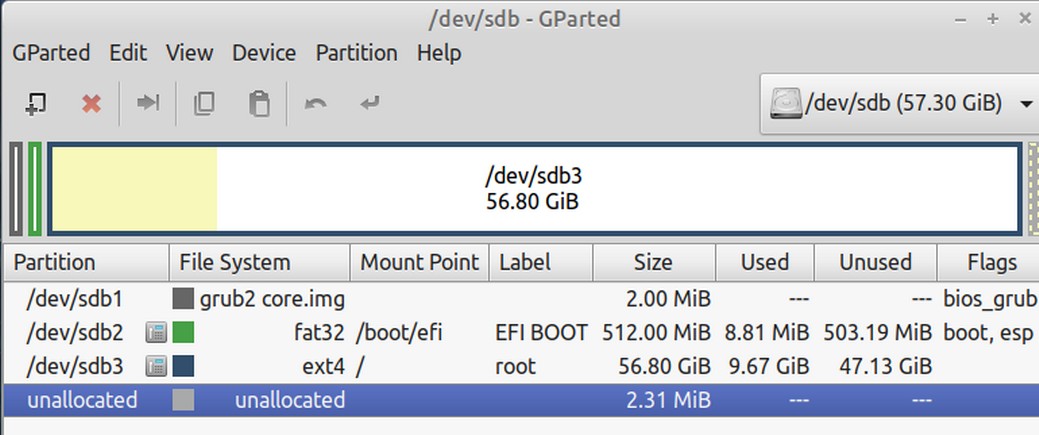
When the installation is complete, do not click Restart Now. Instead, click Continue Testing. Then open Gparted and reset the boot flag for sda. Also look at the change in sdc2 which now shows 8.81 MB used but does not show any mount point. Do not worry. The correct mount point will be set during the first start of the external USB. Finally, note that Linux Mint is only taking 12.5 GB on the external drive.
Close Gparted and click on the Mint Circle in the lower left corner and click on the first icon, red button, and click Shut Down to shut down the host computer completely. At the prompt, remove the Live USB (not the target USB). Then press Enter.
Step 3.11 Enter BIOS and note changes
After the computer shuts down, remove the target USB. Then reinsert it and start up the host computer again, checking BIOS to make sure it is set to boot from the USB. The UEFI boot sequence now shows Ubuntu as the top option. This is the hard drive which has been reformatted for Ubuntu but do not worry as boot loader hijacking likely did not occur. UEFI USB is set for a lower option. Move it to the top option. Then Save and exit BIOS.
Step 3.12 Add Grub to your BIOS Boot Partition
The Grub 2 screen should appear allowing you to boot into either the external drive or your host computer internal drive. Choose the external drive. Turn off screen saver and connect to the internet. Then install and then look at Gparted.
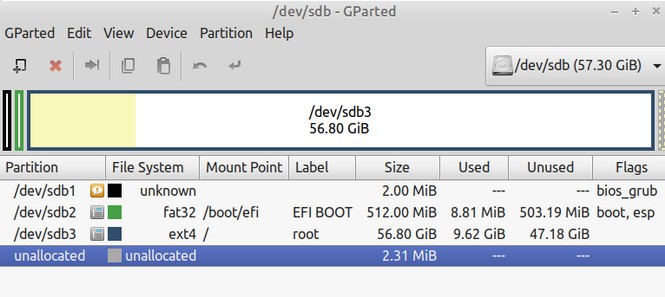
The sdb2 EFI partition mount point is correctly set for boot/efi. Now we simply need to install grub to the sdb1 partition. Close Gparted.
Step 3.13 Use the terminal to install Grub to SDB1
Open the terminal and copy paste:
sudo grub-install /dev/sdb --boot-directory=/boot –target=i386-pc
Press Enter. Then enter your password and press Enter. Then close the terminal and open Gparted again.
Congratulations! You now have two boot loaders – one for BIOS and the other for UEFI.
Step 3.14 Test BIOS Mode
Shutdown, then boot again, using BIOS/legacy mode to confirm successful installation of the BIOS boot loader. It may say Invalid Partition Table. This is likely not a real problem. The invalid partition error is caused by the lack of a Protective MBR shell when in a Legacy BIOS mode. We will fix this in a moment. Just press Enter on your keyboard and it should go to the Grub2 screen and start Mint.
Step 3.15 If Invalid Partition Table Error, add the protective MBR. Once at Mint start screen, open Firefox and navigate to this article so you can copy paste the following commands.
sudo fdisk -t dos /dev/sdb
Enter your password and press Enter, then type a lower case p and press Enter to display the protective MBR. Then type a lower case a to make it active. Here is what your terminal should now look like:
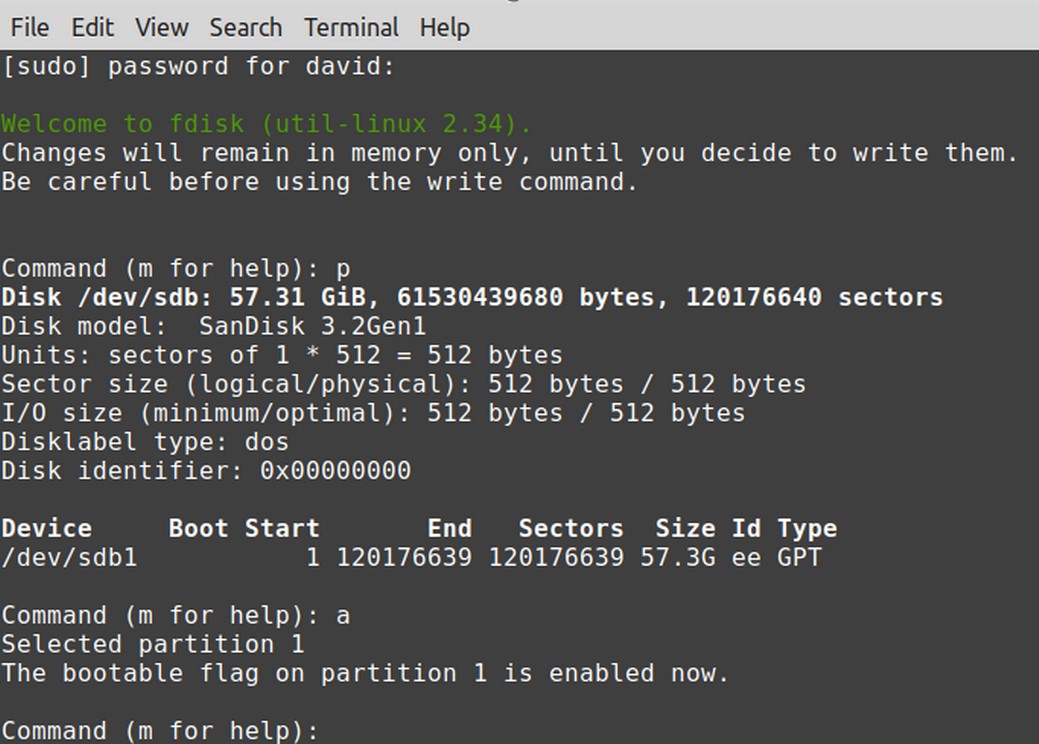
Then type a lower case w then press Enter. Then type exit to close the terminal. Then shut down and power on your Hybrid external drive again to confirm that the Invalid Partition error is gone. You should now have a Hybrid external drive that will boot to almost any computer!
What’s Next?
We will cover all the External Drive post install steps in our next article. For now, just remember to go to Mint Settings and set the screen saver for Never before installing updates on your new external drive.