2 Linux to the Rescue

Chapter 2, Linux to the Rescue, includes the following four sections:

2.1 A Brief History of Linux Operating Systems
2.2 How to Take Linux Mint for a Test Drive
2.3 Advantages of Mint Cinnamon over Mint Mate
2.4 Introducing DistroTweaks… A New Way to Share Linux

In this chapter, we will first learn about open source tools. Because open source is more about building communities over the long term rather than maximizing profits over the short term, novices often have a hard time understanding the huge diversity of open source options – which is the opposite of closed source monopolies. Diversity does add to the learning curve of open source tools, but it also is the reason that open source tools are leading a whole new wave of innovation and security in computer technology. We will then show you how you can test the Linux operating system in a virtual machine to see if you like it. Finally, we will introduce DistroTweaks – a new way to build your own Linux system with just the click of a button!

2.0.01

2.1 A Brief History of Linux Operating Systems

While 99% of us were going through the ordeal of trying to work with either the Microsoft horizontal monopoly or the Apple vertical monopoly, there has been a third option growing in the weeds. Free open source tools, such as Linux, began in the early 1990s when some very forward thinking computer programmers insisted on freedom from the rigid patent structure imposed by commercial outfits like Microsoft and Apple. The free software movement began in 1984 when Richard Stallman left MIT and founded GNU in order to create free software programs. GNU is an acronym for “Gnu is Not Unix.” Richard Stallman stated that GNU is a “technical means to a social end.” The social end was freeing knowledge from the clutches of private corporate monopolies – much like Thomas Jefferson advocated for our public schools as being an essential foundation of our Democracy.

2.1.01

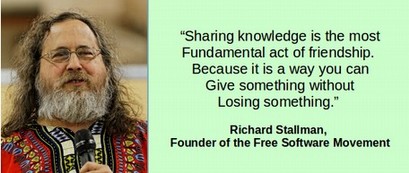
Richard was also following the example of Henry Ford, who challenged the patents that were used in 1911 to monopolize the development of the automobile. After overcoming this patent restraint on innovation, the automobile was able to develop rapidly. Richard Stallman argued that the same freedom from patent restrictions would lead to innovation in the software industry which would benefit everyone. Richard argued that scientific advances were best accomplished in a process of openness and cooperation rather than corporate secrecy. Richard’s goal was to bring a free software operating platform into existence. Stallman wanted computer users to be free to study the source code of the software they use, free to share the software with other people, free to modify the behavior of the software, and free to publish their modified versions of the software. In 1989, GNU published the first General Public License (GPL) under which software is legally shared freely.

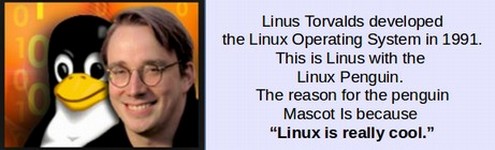
Linus Torvalds Provides the Missing Link

One thing missing from the GNU project was a stable “kernel” or core which is at the heart of the operating system. The kernel can be thought of as the foundation of a house. GNU made all the components of the house, such as the walls and the roof and the plumbing and electrical devices. But the foundation they built it on – a kernel called HURD – was too complex and too unstable. In 1991, a simple, stable kernel was created by Linus Torvalds. The kernel was called Linux since it was based in part on the Unix operating system. The Unix operating system was a private system owed by AT&T which for many years had allowed folks to use their program for free, but in 1979 AT&T decided to start charging to use their UNIX program. Most programmers paid the fee. But some, including Linus Torvalds, decided to create their own operating system.

Quote

b2.1.01

I believe Open Source is the right thing to do the same way I believe science is better than alchemy. Like science, Open Source allows people to build on a solid base of previous knowledge, without some silly hiding... you can never do as well in a closed environment as you can with open scientific methods.
Linus Torvalds 2007


2.1.02

The proper name for the Linux operating system is GNU/Linux. However, as this is difficult to say and remember, most people simply refer to it as Linux and refer to the project which supports much of what goes into it as the GNU project.

Quote

b2.1.02

We worked very hard on creating a name that would appeal to the majority of people, and it certainly paid off: thousands of people are using Linux just to be able to say “I've got Linux. What a cool name.

Linux Torvalds, 1993


2.1.03

Richard Stallman protests that calling GNU/Linux just Linux fails to recognize the role that GNU plays in building the entire operating system. However, in this book we will use the simple term Linux as our goal is to spread the use of this operating system and a simple term is more likely to spread usage than a complex term.

BSD, another free open source operating system is developed – and also paid for by the public

While Linux was the world’s first free open source operating system, it was soon joined by another free operating system called BSD which stands for the Berkeley Software Distribution. This project started in the 1980s with a nearly finished free open source operating system released in June 1991. It was also based in part on the Unix operating system and therefore was a cousin of the Linux operating system. However, lawsuits by similar commercial operating systems, held up release of BSD until 1994 when a court decision held that over 99% of the BSD system did not violate any patents. There are currently several versions of the BSD free operating system.

2.2 Five Ways to Try Linux

The best way to learn how easy Linux is to use is by actually trying it out on your current computer. There are at least 5 ways to try Linux – without the need to remove Windows from your current computer. In this article, we will review some of the pros and cons of each of these methods. The 5 ways to try Linux include:
#1 Put Linux in a Virtual Machine
#2 Dual Boot Linux on your computer.
#3 Put Linux on any old laptop you may have in your closet.
#4 Create a Live USB stick
#5 Create a Persistent USB “Computer on a Stick”

Why Look Before You Leap
It is understandable that, if you have only used Windows your entire life and never had a chance to use Linux, you may be concerned about moving all of your documents over to Linux Mint. Even if you are interested in learning more about Linux, you might want to try it before you take the plunge. Finally, it is useful to learn a simple and easy way to test various operating systems.

#1 Put Linux in a Virtual Machine
A Virtual Machine is a basically installing any operating system inside of an isolated folder inside your current computer hard drive. The problem with virtual machines is they are not very stable over time. Also, any operating system will be slower in a virtual machine (where it can only use part of the RAM) than in a real machine where the operating system can use all of the RAM. In addition, virtual machines cannot be taken from one computer to another. I have written an article explaining the entire process which you can read at this link: https://learnlinuxandlibreoffice.org/2-linux-to-the-rescue/2-2-take-linux-mint-for-a-test-drive

#2 Dual Boot Linux on your computer.
Dual booting requires partitioning your hard drive and giving a portion of the hard drive to one operating system and the rest to a different operating system. A screen then appears when you start your computer which allows you to choose which operating system you want to use. The problems with this process is that partitioning the hard drive can get complex. One mistake and you can bork your entire computer hard drive.

#3 Put Linux on an old laptop you may have in your closet
There are lots of old Windows 7 computers around that do not have enough RAM to run Windows 10 (which requires at least 4 GB RAM and more likely 8 GB RAM). All of these computers work well with Linux Mint (which only requires 1 to 2 GB of RAM). It is relatively quick and simple to take your documents off an old machine and install Linux Mint on it with a USB Live Stick. The only problem with this option is that you may not have an old laptop in your closet. The other problem is that keyboards and screens and hard drives do not last forever. So an older computer may work well with the Linux Mint operating system only to have the monitor or key board go out at some point. Of course, monitors and keyboards can be replaced.

#4 Create a Live USB stick
This is a simple and common option. You can buy a 16 GB USB 3 drive for under $10. Then turn the blank USB into a Linux Mint Live Stick using a free program called Etcher that works well even on a Windows computer. Then set your computer to boot from a USB and start your computer with the USB Live Stick in a USB port. Up comes Linux Mint. The only problem is that none of the changes you make will be saved. So you can practice using Linux and see how well and how easy it works. But you cannot do any real tasks with a Live Stick.

#5 Create a Persistent USB “computer on a stick”
A persistent USB “computer on a stick” is basically adding Linux to an external hard drive that can then be used in place of your computer’s internal hard drive. This is an ideal way to learn Linux because you can use a Computer on a Stick on almost any host computer that is set to boot from a USB drive. It does require a USB 3 drive with at least 64 GB of storage capacity. But these can be bought for under $20. So for an extremely low price, you can learn Linux in a realistic way without ever making any significant changes to your existing computers.

2.2 How to Take Linux Mint for a Test Drive

It is understandable that if you have only used Windows your entire life and never had a chance to use Linux that you may be concerned about moving all of your documents over to Linux Mint. Even if you are interested in learning more about Linux, you might want to try it before you take the plunge. Finally, it is useful to learn a simple and easy way to test various operating systems. Therefore, in this section, we will show you how to install Linux Mint Cinnamon and Linux Mint Mate into virtual machines on your current computer - regardless of whether your current computer is a Windows, Apple or Linux computer. The entire process is free, quick and easy.

There is another reason to learn about Virtual Machines. Linux Mint just came out with Mint 18.3 which has many new features. We can check out how 18.3 Cinnamon and 18.3 Mate work by creating Virtual Machines for each for them. This is a great way to test and/or compare any new or existing operating systems you are thinking about installing on your computer. It is basically taking the operating systems for a test drive.

Mint 18.3 Cinnamon and Mate are available to download on this page: https://www.linuxmint.com/download.php

Click on and download the 64 bit versions of Cinnamon and Mate. These are called ISO files and they will take a while to download.

Install Virtual Box from the Mint Software Center

If you have a Linux Mint computer already, you can quickly install Virtual Box from the Mint Software Center:

2.2.01

If you are still using a Windows or Apple computer, you can go to https://www.virtualbox.org/

Then download the version for your system and install it on your computer. Either way, once you have Virtual Box, click on it to open it.

2.2.02

Click New. Then name the distribution: Linux Mint Cinnamon 18.3.

2.2.03

Then click Next. On the next screen, increase the memory to 1024 MB. Then click Next. The default settings on the Hard Disc screen are good. Click Create. Default setting of VDI on the Hard Disc File Type screen is also good. Click Next. Default setting of Dynamic on the Storage Physical Hard Drive screen is also good. Click Next.

2.3 Advantages of Cinnamon over Mate

In our last section, we set up virtual machines for Mint Cinnamon and Mint Mate. In this section, we will use those virtual machines to demonstrate some of the differences between Mint Cinnamon and Mint Mate.

6 Advantages of Cinnamon over Mate

Mate has one advantage. It uses slightly less power and therefore we could use it without being plugged in about 10% longer. However, Cinnamon has many advantages over Mate that make it a better choice. Here are six advantages.

#1 Cinnamon has a Simpler Menu that Mate

#2 Cinnamon has a more Customizable File Manager

#3 Cinnamon has Better Desktop Background Options

#4 Cinnamon has Better Integration with Mega Encrypted Cloud Service

#5 Cinnamon has Better Internet Connectivity

#6 Cinnamon is under More Active Development

Let's take a closer look at each of these six advantages.

#1 Cinnamon has a Simpler Menu that Mate

Cinnamon has only one Menu screen that contains all the information we need. By contrast, Mate has two menu screens requiring you to go back and forth between them to access different functions. Here is the Cinnamon Menu:

2.3.01

Here is the Initial Mate Menu screen, called the Favorites screen:

2.3 Create a Linux Mint USB Drive with Persistent Storage

A USB External Drive with Persistent storage is also called a Computer on a Stick – because it works exactly like a computer with an internal hard drive. The only difference is that a computer on a stick does not have a keyboard and monitor. It therefore borrows the monitor and keyboard of the “host” computer which it is plugged into. When you work with programs and save documents, instead of using the host computer internal hard drive, you use the USB external drive to run programs and save documents.

01

The benefit of having a computer on a stick is that you do not have to actually change anything other than a couple of BIOS settings on your host computer to allow it to boot from an external drive rather than its internal drive. This means you can keep your Windows computer just the way it is and still use a Linux “computer-on-a-stick” to learn how to use Linux and/or to set up a Linux web development test environment.

A Linux USB without persistent storage is called a Live USB and is normally used to replace the prior operating system on the hard drive (either Windows or Linux) with a newer version of a Linux operating system. You can start a computer with a Live USB and do things like installing programs, saving files, and changing settings. But, as soon as you turn off and turn on your computer, all your changes you made with the Live USB will be gone.

If you want a USB drive that retains the changes you make, you need to create a USB with persistent storage – a computer on a stick. With persistence, whenever you boot the USB drive on any computer, your files, settings, and installed programs will be there. This allows you to take your work with you and work on almost any computer anywhere anytime. A Persistent USB also allows folks to learn about Linux on their existing computer without the need to create virtual machines or dual boots.

This method of creating a computer on a stick is ideal for teachers and students because it allows them to use a school’s computer lab without altering in any way any of the computers in the lab. Students can save their work and bring their Linux Mint Persistent sticks home and continue to practice using Linux on any computer they may have at their home.

But the most important reason to create a persistent USB drive is that you can test Linux based business website development programs without ever having to worry about borking your normal computer. This is why creating a computer on a stick is called setting up a TEST environment. If things go bad, you simply reflash the USB drive and start over. In this article, we will review the steps for creating a computer on a stick.

a1

Obtain an External USB Drive or SSD Drive
You’ll need a USB drive with enough storage capacity to set up persistence. The least expensive option is to buy a USB 3 drive with at least 64 GB of storage . Since the Linux Mint operating system takes less than 15 GB of storage, you can use a 32 GB USB 3 drive. However, the bigger the USB drive, the more persistent storage you can have. Also, the more storage you have on the drive, the longer it will last. Amazon has 64 GB Sandisk USB 3 drives for as low as $12 each. The problem with these small USB drives is durability. Do not expect them to last more than a couple of years when running a full operating system. A more durable option is to buy an External USB SSD.

2.4 Introducing DistroTweaks... A Revolutionary New Way to Customize and Share Linux

In our previous sections, we learned that there are more than 100 different Linux distros – or operating system distributions - each serving a slightly different purpose with a slightly different bundles of programs for different communities of users. We then created two Virtual Machines to compare two closely related distros, Linux Mint Mate and Linux Mint Cinnamon. In this section, we will introduce a new way to customize and share Linux through a process and a product we call a DistroTweak. Let’s start with a familiar story:

2.4.01

Our purpose in writing this book is to explain, in a series of detailed steps, how to make dozens of changes to the Linux Mint operating system to turn it into a powerful tool for writing books, developing courses and creating websites - what we call “sharing knowledge”. We also review how to add and use more than twenty free programs to Linux Mint and provide dozens of steps for customizing a free open source word processor called LibreOffice. The advantage of following our book and doing all of these steps on your personal computer is that it will help you better learn what is possible with Linux and LibreOffice and better understand how to use Linux and LibreOffice. But there are some “realistic” drawbacks to actually doing all of these dozens of customization steps. First, it is a question of time. It will likely take you several days to work your way through all of these steps. A lot of people are already very busy with their existing work and family obligations. They may not have the time to learn about and perform all of these intricate steps.

2.4.02

Second, there is the question of skill or interest. Many people who want to write books, teach courses and/or build websites do not have either the skill or the interest to perform all of these customization steps. We have spent years teaching courses in computer programming and website construction. We understand that many people do not even know how to right click on their computer screen - much less copy and paste cryptic commands into the Linux “black box” terminal. In order to solve this problem of helping folks have a customized operating system, without making all the customizations themselves, we have created a new and revolutionary way to quickly and easily share our custom operating system. We call this new way a “DistroTweak” and we are describing it here in this book for the very first time.

How Creating a DistroTweak Solves a Lot of Problems

We teach courses in writing books and creating complex interactive websites and we want our students to have access to the same custom computer system and the same custom programs we are using. We have made several dozen minor modifications to Linux Mint and we have added a couple of dozen programs to the default programs that come with Mint. We have also made more than one dozen modifications to LibreOffice – one of the default programs that comes with Mint. Before we invented DistroTweaks, what our students had to do in order to get a computer that looked exactly like ours was to read our books and then follow all the dozens of steps listed in our books. While this is a good learning exercise, and students should read our books in order to understand why we made these dozens of modifications, this “learning by doing” process is a long ordeal that may be too intimidating for a lot of our students.