4 Pinebook Pro Tips

The Pinebook Pro may be the most revolutionary computer ever produced. Not only does it cost a mere $200, but it offers us a laptop that is more secure than laptops costing more than a thousand dollars. It combines a high resolution screen with a very long battery life in a very light package - making the Pinebook Pro an ideal computer for students. We therefore offer the following four articles on how to set up and use the Pinebook Pro:

4.1 Initial Startup Tips

4.2 Install and Simplify LibreOffice

4.3 Install Additional Programs

4.4 Connect a Printer

4.1 Initial Startup Tips

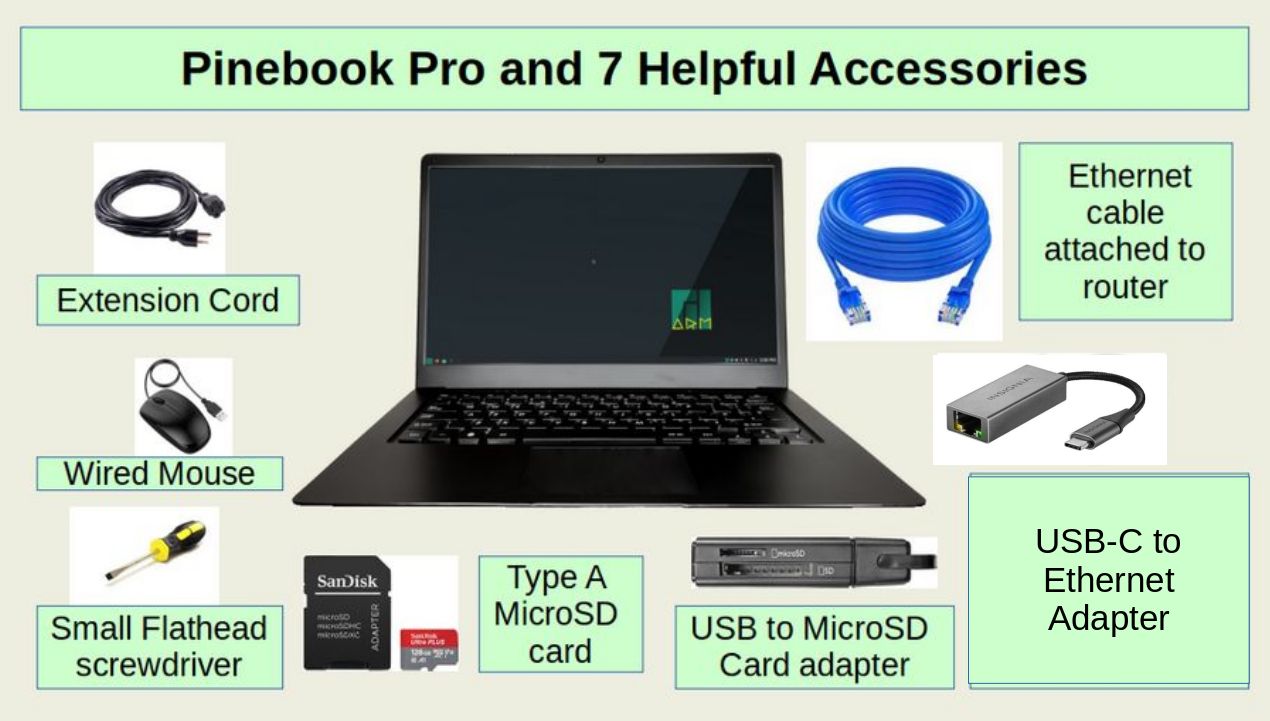
In this article, we will explain why to buy and how to set up and use the revolutionary 14 inch laptop called the Pinebook Pro. We will also review how and why to add some helpful accessories to your Pinebook Pro. Even with these accessories, the Pinebook Pro costs under $300. Yet it has better security than many computers that cost over $1000. Such a low price means that parents and school districts can buy data secure computers for their students for the very first time. Thus, the Pinebook Pro can be the beginning of a new era of learning.

01

Why the Pinebook Pro may be the most important new laptop ever introduced
There is an extreme shortage of secure computers in the world today. By this I mean that most computers being sold are either Windows, Google or Apple. All three of these brands are NSA Prism Partners meaning that they have hidden back doors that allow either the US Government and/or hackers to remotely access and control your computer. They can also hold your computer data for ransom and remotely brick your computer completely – to the point where it will no longer even turn on.

4.2 Install and Simplify LibreOffice

LibreOffice is the most important program we will use to create our websites. Sadly, Manjaro Plasma does not comes with LibreOffice. To add LibreOffice, first make sure you have an active Ethernet connection. Then go to Applications, System, Add Remove Software. Then change the category to Productivity and scroll down to Libre Office Fresh and click the Download arrow. Then click Apply and enter your password. Check all of the optional dependencies and click Choose. Use the default for Java runtime and click Choose. Then click Choose again. Then click Apply. It will take about 30 minutes to download and install LibreOffice.

Create two new folders
Before we simplify Libre Office, we need to create a new folder specifically to hold images saved by Libre Writer. In our previous article, we installed the Nemo file manager and right clicked on the screen. Click Create New Folder. Then name the folder apps. Repeat to create a second folder called 0-my-images.

Simplify Libre Writer
To open Libre Writer, click Applications, Office and right click on Writer to place the Writer icon on the bottom panel. Then click on the icon to open Writer. Here is the first extremely complex screen when opening Libre Writer:

01

Click View and uncheck the status bar, ruler and sidebar. Then click Tools, Customize, Toolbars, Standard to hide some of the icons. Then hide icons on the formatting tool bar.

4.3 Install Additional Programs

We have already install the Nemo File Manager, the Arimo font package and Libre Office on our Pinebook Pro. In this article, we will install and review how to use more than two dozen additional programs. As a reminder, make sure you are connected to the Internet via a reliable Ethernet Connection before installing any programs to keep the software database properly synced. Here is a list of the programs we will install:

Install first from Software Manager

#1 Falkon Browser (no keyring)

#2 Chromium Browser

#3 Gthumb Image Editor

#4 Gpick

#5 Bluefish

#6 Krita Image Editor

#7 Pinta Image Editor

#8 MC (Midnight Commander File Manager – no samba)

#9 Krusader File Manager

#10 ClipGrab Video Downloader

#11 Open Shot Video Editor

#12 Simple Screen Recorder Video Recorder (no lib32)

#13 Guvcview Web cam recorder

#14 VLC Video Player (no libva-intel-driver) restart required

#15 Thunderbird Email Organizer

#16 Sigil EPub Editor

#17 Document Scanner (simple-scan)

#18 Gparted Hard Drive Partitioner

#19 Remmina Remote Desktop Viewer

#20 KDiff3 File and Folder Comparison

#21 System Monitor RAM tracker

Then install from the Arch User Repository:

#22 Webcamoid Web Cam Recorder

#23 Gnu Cash Accounting Program

#24 Search Monkey File Comparison Program

#25 K4dirstat Hard drive viewer

Install additional web browsers #1 Falkon Browser (no keyring)
While I use Firefox for web development, I need other browsers to test the appearance and function of my websites on Chromium-type browsers as well as a Firefox based browser I can use so that I am not logged out of Firefox while clearing the browser cache. I have historically used Libre Wolf and Brave. However, Libre Wolf does not currently work with the Pinebook Pro and Brave does not offer an ARM version. To see our ARM based browser options, go to Add Software and click Categories, Communication. Then scroll down to see the available browsers. We will first install the KDE browser called Falkon. Click the download arrow.

4.4 Connect a Printer and Solve Other Problems

In our three previous articles, we have reviewed the initial setup of a Pinebook Pro, configuring LibreOffice and installing 24 additional programs. In this article, we will explain how to connect a printer to the Pinebook Pro and solve other common problems.

Install Epson Printer Drivers
Each printer will require a slightly different process. I have an Epson Eco Tank (ET) printer. So these instructions apply to that printer. But the process for your printer may be similar. To get clues for the process for your printer, do a search for Manjaro ARM name-of-your-printer or Pinebook Pro name-of-your-printer.

We need some programs from the Arch User Repository. We have previously enabled it in our prior articles. But if you have not yet done this, open Add/Remove Software and click Preferences. Enter your password. Then click the Third Party tab and click enable AUR support. Then type this term into the search box: epson-inkjet-printer-escpr2

01

This will install 11 packages. then for scanner. Click the download arrow. Then click Apply.

02

Click Edit the build file. Line 5 reads: arch=('i686' 'x86_64' 'armv6h' 'armv7h'). Change it to read:

arch=('i686' 'x86_64' ‘aarch64’ 'armv6h' 'armv7h')

Then click Save. Then click Apply. It should end with: Transaction successfully finished.